All posts by admin

Instant Fixes To Eliminate QuickBooks Error Code 40003 Smoothly

The time has gone when business owners have to spend half of their crucial time managing and processing their company payroll manually. The QuickBooks Payroll software has reduced the stress of manually calculating and paying the employee’s payroll on time. But, sometimes, the users might stumble upon QuickBooks Error Code 40003 while installing the most recent payroll update. The error might occur due to the damaged or corrupted data files.

Sometimes, you may see the QuickBooks error message 40003 while using an invalid payroll subscription or poor internet issues. Consequently, the error might hamper the company’s payroll process and delay paying employees. Therefore, it’s crucial to troubleshoot the error timely to process the payroll on time seamlessly. 

Discovering what you should do to overcome QuickBooks Error Code 40003 easily? Ring us at +1-833-460-2030 and consult with our professionals to obtain the sure-shot solutions within the shortest time possible. 

Error Fix it now

What Exactly Do You Understand By QuickBooks Error 40003?

In most cases, users might discover QuickBooks Error 40003 while trying to access their data file. Upon the arrival of the error, the following message comes into view. 

Error 40003: Unable to access the QuickBooks company file.”

Issues with the QuickBooks Database Server Manager are one of the reasons responsible for QuickBooks Error Code 40003. In other cases, it may also happen when the users don’t have enough file permissions to get the latest payroll updates. To know more about the reasons that triggered the error, symptoms, and possible fixes, continue reading this post. 

What Could be the Possible Reasons Behind Error Code 40003 QuickBooks?

The first thing that comes to the user’s mind when the error occurs is the main cause behind the error. Likewise, whenever the users end up with Error Code 40003 QuickBooks, they might think about the exact reason behind the issue. So, to understand the main problem, you must read all the causes given below properly. 

  1. The users mainly get stuck with QuickBooks Error 40003 due to the presence of damaged QuickBooks files or components. 
  2. Misconfigured firewall settings could also be responsible for the error. 
  3. Problems with the QuickBooks Payroll update could also occur because of the inadequate internet connection. 
  4. Working on an unsupported version of QuickBooks Desktop is one of the reasons that triggered QuickBooks Desktop Error 40003. 
  5. Sometimes, it could happen due to an improper setup of the QuickBooks Desktop. 

How Can I Recognize the Occurrence of QuickBooks Payroll Error 40003?

After knowing the possible causes, let’s look at the instances when you observe the occurrence of QuickBooks Payroll Error 40003. So, let’s begin. 

  1. Whenever the users end up with QuickBooks Error 40003, they won’t be able to access the data file. 
  2. The users might need help updating the payroll tax table or issues sending payroll data. 
  3. You won’t be able to see the forms in QuickBooks Desktop. 
  4. In other cases, you may see the continuous freezing of QuickBooks Desktop.

Read More- How to Resolve QuickBooks keeps Crashing Issues?

Best Techniques to Decode QuickBooks Error Code 40003 

Herein, we have discussed the best effective methods to rectify QuickBooks Error Code 40003. Before using these steps, ensure you have generated the backup of the data file to safeguard your data from loss or damage. 

Resolution Method 1: Get the Most Updated Version of QuickBooks Desktop

  • In the initial stage, you must ensure that you run QuickBooks in the no-company open window.
no company open
choose update QuickBooks desktop option for most updated version
  • Consequently, it will redirect you to a new screen. Herein, you are supposed to pick the Update Now tab and ensure that you have selected the Reset Update checkbox
  • Thereon, navigate to the Get Updates button and wait until the download process is going on. 
  • You are supposed to launch the QuickBooks application once again and hit the Help menu. 
  • Next, opt for the Update QuickBooks Desktop and tap the Overview tab. 
  • Ultimately, hit the Update Now button and wait until the update process is completed. 

Resolution Way 2: Make the Necessary Changes in the Windows Firewall Setting 

Most of the time, Windows Firewall blocks access to the programs installed on your device to safeguard your company’s data. However, if you find that QuickBooks is in the list of firewalls, creating an exception is necessary using the steps below. 

  1. In the initial stage, press the Windows key and insert “Windows Firewall” into the search panel. 
  2. After that, pick the Advanced Settings option, navigate to Inbound Rules, and right-click on it to opt for the New Rule option. 
  3. Thereon, move to the Programs option > Next > This Program Path > Next button.
  4. You should choose one executable file for QuickBooks from the list of files. Herein, you are supposed to repeat the same process for all the listed QuickBooks files. 
  5. In the next step, hit the Next button and press the Allow the Connection button. 
  6. Now, you must pick all the profiles from the following section and then hit the Next button.
  7. Furthermore, create and assign a name to the rule as “QBFiewallException(name.exe)“.
  8. The users are supposed to perform the same steps for preparing the Outbound Rules of all the .exe files in QB. 
  9. At last, launch the QuickBooks application, hit the File menu, and then navigate to the multi-user mode

Resolution Way 3: Try To Run QuickBooks As an Administrator 

  1. To run QuickBooks as an administrator, locate the QuickBooks icon. 
  2. After that, you must right-click the QuickBooks icon and pick the Run as Administrator option. 
  3. Thereon, when the permission window displays on your screen, you must choose the Yes button. 
  4. You will notice that the QuickBooks Desktop will open on your device, and then you can try to run the payroll operations again. 

Resolution Way 4: Check Your Computer’s Time and Date

  1. In the first place, you must press the Windows key and open the Windows settings.
  2. Thereon, you must pick the Time and Date settings.
  3. You are supposed to choose the appropriate date and time for your PC according to your region.
  4. At last, ensure that you have picked the correct time zone

Resolve Way 5: Operate the Verify and Rebuild Data Utility Tool 

The users might sometimes end up with QuickBooks Error 40003 due to the damaged QuickBooks component. Therefore, you must repair the damage by operating the verify and rebuild data utility tool to overcome the issue. 

  • Primarily, tap the Windows icon and insert QuickBooks into the search panel.
  • After that, you must right-click on the QuickBooks icon and opt for the Run as Administrator option. 
  • From the upcoming screen, navigate to the File menu > Utilities > Verify Data
choose file menu then utilities then verify data
  • Thereon, you must give the Rebuild Data tool enough time to diagnose the issue. 
  • As a result, the toll will present some of the messages on the screen stating:
  • QuickBooks detected no problem with your data” represents that there is no issue.
  • A particular error message will prompt you to follow the steps mentioned below.
  • Your data has lost integrity” means you must repair your file. 
  1. Afterwards, choose the File tab > Utilities > Rebuild Data option. 
  2. Furthermore, you must construct a data file backup and then carry on with the on-screen instructions to accomplish the process. 
  3. Thereon, you must run the Verify Data Tool again to ensure the issue is resolved. 
  4. In the end, reboot your device and then try to download the latest payroll updates

To Summarize the Above!!

We hope that this write-up will help you get the latest payroll tax table update without getting QuickBooks Error code 40003. if you still see that you are encountering issues while getting the updates, it’s hampering your work. In that scenario, we suggest you connect with our professionals to get all answers to your queries within the shortest time possible.

Troubleshooting QuickBooks Online Delivery Server Down Error

QuickBooks has gained immense popularity among the businesses as it offers exceptional features to simplify your accounting tasks. Despite being an extraordinary software, it is still prone to technical errors, including QuickBooks Online delivery server down time. This error mainly arises when users try to send emails or invoices through the accounting software. It could happen while using the incorrect email address format in QuickBooks. 

Consequently, the QuickBooks Delivery Server error might interrupt the users in sending emails or invoices. Eventually, it might lead to a delay in the ongoing process, which might hamper the workflow. So, stop wasting your time and find the solutions in this blog to rectify the error. 

Are you facing issues while fixing the QuickBooks Online Delivery Server Down error? Well, in that case, you must reach out to our professionals by placing a call +1-833-460-2030 and get your issue resolved within no time. 

Error Fix it now

What Must You Know About QuickBooks Delivery Error?

At times, the users may confront QuickBooks Delivery error in QuickBooks Online when they attempt to send the invoices or attachments to the customers and fail to do so. Consequently, this error stops the users from sending emails using the software.

However, numerous causes that may lead to the error are explained below. So, stick to this post till the end and fix the issue as soon as possible. 

Possible Causes That Might Emerge Delivery Server Down Error In QuickBooks Online

Before you fix the Delivery Server Down Error in QuickBooks, you must know the root causes behind the issue. As a result, it will give you a clear picture of the actual cause of the issue so that you can fix the error easily. Below, we have mentioned all the factors responsible for the error; check them out. 

  1. Users often confront this error when your company and customer-facing email address is incomplete or has technical glitches. 
  2. Another reason could be using incorrect PDF settings in the browser.
  3. In other cases, it may also arise when your invoice comprises some special characters.  
  4. An inadequate internet connection could also be responsible for delivery server down errors in QuickBooks. 
  5. Sometimes, it may happen when the format of the email address used in sales form is inaccurate.
  6. Misconfigured Adobe Acrobat or Reader settings can also be the reason behind the Delivery Server Down error in QuickBooks Online. 

Read Also- What To Do When QuickBooks PDF Component Missing?

How Can I Deal With QuickBooks Online Delivery Server Down Error?

If you don’t get the proper solutions to deal with the problem on time, then it’s completely useless. So, to deal with the issue right away, we have provided you with some effective solutions below. 

Resolution Method 1: Verification of Your Email Address Format 

Incorrect formatting of the email address in QuickBooks might lead to the error, so to rectify the issue, you must check the formatting of your email address using the instructions outlined below. 

Stage 1: Cross-check your Company And Customer-facing Email Address 

The users must confirm that their company email and all customer-facing email address fields are complete and in the correct format. To do the same, you must apply the steps listed below. 

  1. Primarily, move to the Settings menu and opt for the Account and Settings option. 
  2. Thereon, navigate to the Company tab and then hit the Contact Info tab. 
  3. You must verify that the Company Email and Customer-facing email you have entered is correct. 

Stage 2:  Look Into Your Location’s Email Address 

For instance, if you are utilizing the location tracking feature, you must go through the email address format of the location on your sales form. 

  1. Initially, navigate to the Settings menu, choose All Lists, and then the Locations tab. 
  2. Afterwards, you must pick the appropriate location on the invoice. 
  3. Thereon, from the Action column, tap on the drop-down menu and then click the Edit menu. 
  4. You must verify your email address in the field that says, “This location has a different email address for communicating with customers” and make the necessary changes if required. 
  5. In the next step, choose the Save option and try to resend your sales form. 

Resolution Method 2: Review the Format Of Your Invoice 

Sometimes, the inappropriate invoice format might be the reason behind the QuickBooks Delivery error. So, to prevent the issue, you must use the steps listed below. 

  • Firstly, the users must open the invoice you failed to send due to the error. 
  • After that, you must check that the invoice doesn’t contain any special characters like  (! @ # $ % ^ & * ( ) _ – = + : “) on the information listed below.
    • Attachment name
    • Email address
    • Custom Form Templates
    • Description
    • Message 

Related article- QuickBooks Crashes When Sending Email? Use These Easy Tricks

Resolution Method 3: Double-check your Sales Email Option 

The users must update the attachment setting when mailing the sales forms. For that, you must perform the following steps carefully. 

  1. To start the process, navigate to the Settings menu and opt for the Account and Settings option. 
  2. Thereon, choose the Sales tab and then go to the next step. 
  3. You must move to the Online Delivery section and find whether the checkbox stating PDF Attached is marked. If it’s already marked, then unmark the checkbox and move ahead. 
  4. Once you have made all the necessary changes, choose the Save button followed by the Done option. 
  5. Ultimately, you must send the sales form again and check whether the issue persists. 

Resolution Method 4: Monitor Your Adobe Acrobat or Reader Settings 

Using the steps below, you can also resolve the QuickBooks delivery error by testing the Adobe Acrobat or Reader Settings. 

  1. Begin the process by accessing the Page Size & Handling section. 
  2. Afterwards, pick the Actual Size and choose the paper source by PDF page size
  3. Thereon, move to the Orientation section and browse the Auto portrait/landscape option. 

Resolution Method 5:  Do the Proper Configuration Of Your Print And PDF Settings 

The users must ensure that the file they are linking isn’t a ZIP file. Also, you must ensure that the file size won’t be more than 25 MB. However, if you see that the name of your QuickBooks data file contains some special characters, then delete it instantly. 

Read More- How To Fix PDF And Print Problems In QuickBooks Desktop?

Resolution Method 6: Go Through Your Browser’s PDF Settings 

The steps to change the browser’s PDF settings may vary according to your browser. Below, we have discussed the steps for Google Chrome and Mozilla Firefox browsers. Use the steps according to the browser you are using.  

For the Chrome Users 

  1. Start the process by launching Google Chrome on your device and clicking the three vertically placed dots located at the top-right corner.
  2. From the extended list of options, pick the Settings option. 
  3. Afterwards, scroll down to the bottom of the screen and tap the Advanced drop-down menu
  4. Thereon, navigate to the Content Settings option followed by PDF Documents
  5. You are supposed to disable the Download PDF Files option rather than opening it in Chrome
  6. Finally, sign in to your QuickBooks data file and send the forms again to check whether the issue is resolved. 

For The Users of Mozilla Firefox 

  1. In the first place, launch the Firefox browser on your workstation and move to Options. 
  2. From the left menu, browse the Applications tab and proceed further. 
  3. Go to the Content-Type section and look for the Portable Document Format (PDF)
  4. As a result, you will see the Action drop-down menu, from there, tap the Use Adobe Reader (default) option. 
  5. You are supposed to sign in to the company file and try to send or print the forms again. 
Conclusion!!

With this post’s help, we hope you can easily resolve the QuickBooks Online delivery server down error. If you are still encountering any issues due to the error while sending the invoices, then get help from our experts at +1-833-460-2030. They will assist you with some useful tips to eliminate the issue right away. 

QuickBooks Crashes When Sending Email? Use These Easy Tricks

Have you ever experienced QuickBooks crashes when sending email or invoices? If yes, then you are not the only one stuck in this situation. The users might often confront this issue due to the corruption in the hard drive. Other reasons that might give rise to the error are damaged Windows components or issues with Microsoft Office. 

Consequently, the occurrence of QuickBooks freezes when trying to email invoice issues might lead to a loss of unsaved information. Therefore, resolving the issue immediately using the troubleshooting methods discussed in the post is essential. 

Does your QuickBooks crashes when sending email, and don’t know how to overcome the issue? Call us at +1-833-460-2030 and consult with our experts instantly to get all your queries resolved within no time. 

Error Fix it now

What are the scenarios Where QuickBooks freezes when sending Email? 

Users may observe QuickBooks freezes when sending email issues in the following instances. 

  1. When the users attempt to link their QuickBooks data file with the email.
  2. In other cases, it may happen when users try to utilize the Send Forms function within the QuickBooks application. 
  3. You may also observe the error while opening the check register in QuickBooks. 

Read More- How to Fix QuickBooks keeps Crashing Issues?

Reasons Why QuickBooks Desktop Crashes When Sending Email  

Are you thinking about why QuickBooks Desktop crashes when sending email? If so, go through all the factors listed below that are responsible for the error. 

  1. Sometimes, the users might confront QuickBooks crashes when sending email issues when the Microsoft Windows components are damaged. 
  2. There might be the possibility that QuickBooks cannot connect with the email server. 
  3. In other cases, it may happen when some third-party programs obstruct the connection between QuickBooks and the email server. 
  4. Users might confront this error due to the accidental deletion of the QuickBooks company file. 
  5. You might face difficulty while accessing the QuickBooks application. 

Best Strategies to Rectify QuickBooks Crashes When Sending Email Issues 

Does your QuickBooks crashes when sending email, and you don’t know how to fix the problem? In that scenario, you must use the resolution methods listed below to resolve the issue. Ensure you apply the resolution methods in the same manner as described below. 

Resolution Way 1: Verify the Settings Of Webmail Preferences 

Sometimes, improper webmail settings give rise to QuickBooks crashes when sending emails. Therefore, you must try to change the webmail settings by following the instructions to overcome the issue. 

  • Start the process by opening the QuickBooks application and accessing the Edit menu.
  • Afterwards, navigate to the Preferences tab and hit the Send Forms option. 
Tap on Send forms option
  • Thereon, opt for an email account from the My Preferences section and click the Edit menu. 
  • In the next step, you must confirm that you have selected the SSL checkbox
  • Also, you must ensure that the server’s name matches the Server name field.
  • However, if the outgoing mail is fixed as “SMTP.mail.gmail.com,” you must modify the name to “intuit.SMTP.mail.gmail.com.” 
SMTP Server Details
  • After making the necessary changes, hit the OK button and move to the next step. 
  • End the process by launching the QuickBooks program and then try to send the mail. If you observe that you are still receiving the error, then move on to the next resolution method. 

Resolution Way 2: Make Use of a Secure Webmail 

If you still receive QuickBooks desktop freezes when sending email issue, then you must try using a secure webmail in QuickBooks to resolve the problem. Follow the steps listed below to get the desired outcome.  

  • In the beginning, launch the QuickBooks application and then navigate to the Edit menu. 
  • Afterwards, choose the Preferences tab and opt for the Send Forms tab. 
choose the Edit option then click on Preferences
  • Now, you are supposed to pick the Webmail option and click Add
tap on webmail option and click add
  • In the next step, opt for the service provider and include the email address properly.
  • Thereon, you must ensure that you have kept the “Use Enhanced Security” checkbox unmarked. 
  • Next, hit the OK button, launch QuickBooks, and then add the login credentials accurately.

Resolution Way 3: Include Windows Admin User 

Go through the following instructions to add a Windows admin user accurately. 

  1. You are supposed to include Windows users with specific admin rights, so you must hit the Windows key. 
  2. After this, navigate to All Programs and opt for Windows Small Business Server. Then, choose the highlighted Windows SBS Console. 
  3. There on, tap the Users and Groups and then click to include a new user Account tab.
  4. In the next step, you must allow a new user admin rights and hit the Finish button to end the process. 
  5. Relaunch and then try to sign-in to Windows by establishing a new user. Later on, try to launch the QuickBooks application once again. 

Resolution Way 4: Try To Install the Latest Update Of Microsoft Outlook 

Herein, go through the following instructions to install the most recent updates of Microsoft Outlook. 

  1. Launch Microsoft Outlook on your system in the initial stage and pick the Office Account
  2. Afterwards, navigate to the highlighted Update Options to proceed further. 
  3. End the process by hitting the Update Now button. 

Resolution Way 5: Link an Email Account With the Microsoft Outlook 

  1. Primarily, hit the File menu in Microsoft Outlook and then pick the Info tab. 
  2. After this, choose Add an Account to start and include the email address you need to add to the respective text field. 
  3. Once the Microsoft Outlook has chosen the server, hit the Connect button to proceed. 
  4. Thereon, you must add the password accurately and click the OK button to wind up the process. 

Resolution Way 6: Setting Up Microsoft Outlook as the Default Mail Application 

  1. To set up the Outlook as Default Mail, navigate to the Control Panel and move further. 
  2. After this, browse to the Programs followed by the Default Programs option. 
  3. In the next step, pick the Default Program for the mailing option and proceed further. 
  4. Now, you must opt for Microsoft Outlook and hit the Save button to make the selection. 

Resolution Way 7: Try to Operate QuickBooks in Compatibility Mode 

  1. In the first step, launch the QuickBooks application and then navigate to the Properties option. 
  2. After this, you must run the QuickBooks program in the Compatability mode. 
  3. From the list of options available, select Windows 7 and mark the checkbox of “Run this program as an Administrator.” 
  4. Thereon, pick the Apply option and end the process by hitting the OK button. 

In a Nutshell!!

Using this illustrative guide, we hope you can now easily overcome the QuickBooks crashes when sending email issues. However, if you still encounter issues while sending emails, connect with our experts anytime to fix your problem. They will guide you with useful tips to deal with the issue immediately without much effort. 

Simple Tactics To Debug QuickBooks Error 1000 Effortlessly

 Are you facing trouble while attempting to send payroll paychecks in QB due to QuickBooks Error 1000? Wondering what’s the reason behind the error? The main reason behind this error is adding the incorrect payroll PIN required to use the payroll services. In other cases, it may arise due to the issues on the end of the financial institution. 

Consequently, the Error Message Code 1000 in QuickBooks Desktop stops the users from sending paychecks. Thus, it delays paying the employees on time using QuickBooks. So, getting rid of the error instantly with the right troubleshooting methods is necessary using this post. 

Having difficulty while trying to resolve QuickBooks Error 1000? Ring us at +1-833-460-2030 and get your issue resolved without making much effort within the shortest possible time. 

Error Fix it now

What Do You Understand By QuickBooks Error 1000?

Before accessing the QuickBooks Payroll service, the users might require a valid Payroll PIN to run the payroll services smoothly. However, there might be certain instances when the users add the wrong PIN to register payroll, which might result in QuickBooks Error 1000. Whenever the error appears, it throws the following error message on the screen stating: 

Problem: The PIN has been entered incorrectly too many times. For security we’ve temporarily locked access to the payroll service. Solution. Wait 15 minutes and then re-enter your pin. 

[Message Code 1000]” 

QuickBooks error 1000

Or,

“Invalid PIN: You have entered an incorrect PIN three times. Please try again later”

Consequently, this error prevents the users from sending payroll checks or accessing the Payroll Tax Center. However, before fixing the issue, it is necessary to know the root causes behind the error. So, let’s begin reading this post and tackle the issue instantly. 

Reasons For the Appearance Of QuickBooks Error Code 1000

Knowing the exact cause behind the QuickBooks Error Code 1000 is necessary to resolve the issue instantly. Herein, we have elaborated on all the root causes that might give rise to the error. 

  1. You may have entered the wrong PIN multiple times, which might block your access to the payroll service. 
  2. It could be possible that you have mentioned the wrong PIN three times. 
  3. Sometimes, it could happen when your bank has gone under maintenance. 
  4. In other instances, the years might confront QuickBooks Error 1000 because of the poor internet connection. 

Learn More- How to Download the Latest QuickBooks Payroll Tax Table Update?

Effective Solutions to Eliminate Error Code 1000 In a QuickBooks Desktop 

This blog’s section lists all the experts’ recommended solutions to rectify Error Code 1000 in a QuickBooks Desktop. Read all the troubleshooting methods listed below and apply the one that fits best according to the cause of the error. 

Fixation Method 1: Change the Password In QuickBooks 

Sometimes, the users might receive QuickBooks Error 1000 while using the incorrect payroll PIN. So, to rectify the error, users must recover their payroll passwords. You can either restore the password manually or via mail. We have discussed the procedure of both processes below; check them out.

Way 1: Manually Resetting of Password 

To resolve the QuickBooks Error 1000, you must manually try to change the password you have added incorrectly. For that, you must follow the steps instructed below to get the desired outcome. 

  1. In the initial stage, run the QuickBooks Desktop with the help of an admin account. 
  2. Afterwards, move to the Employees menu and tap Send Payroll Data to proceed further. 
  3. Now, the users must navigate to the Send/Receive Payroll Data window and hit the Send button. 
  4. Thereon, tap the Forgot Your PIN button from the Payroll Service PIN window. 
  5. You are supposed to mention your QuickBooks admin password correctly in the respective text field and select OK
  6. At last, add the new payroll PIN according to your choice and hit the Submit button to restore the changes. 

Way 2: Mail Your Password 

In this process, the users are supposed to complete the form and mail it to Intuit. Apart from this, you are also supposed to link an ID Proof with it. Furthermore, use the steps given below properly to mail your password. 

  1. To commence with, the users are supposed to get the QuickBooks PIN Replacements Form download. 
  2. After this, you must mention all the relevant details and attach one valid proof of ID from the government to verify your identity. 
  3. Once done, you must send the form and the proof of ID to Intuit. 
  4. End the process by contacting the customer support team to obtain a new payroll PIN. 

Fixation Method 2: Wait For About 15 Minutes 

Adding the incorrect Payroll PIN might keep the users locked for certain security reasons. In that scenario, you only need to wait around 15 minutes before trying to enter the PIN again. 

Conversely, if you need to remember the PIN, you must complete the PIN replacement form. 

Fixation Method 3: Reconnect Your Bank Account 

If you are still getting Error Message Code 1000 in QuickBooks, then you must try to reconnect your bank account. To continue with the process, have a look at the procedure given below. 

Stage 1: Verify Your Bank Transactions 

  1. In the initial stage, move to the Banking menu or Transactions menu. 
  2. After that, tap on the blue blank square next to the bank account you wish to disconnect.
  3. Thereon, hit the highlighted For Review tab and then proceed further. 
  4. Next, you need to include, review or tally the transactions on the list. 

Read More- Fix QuickBooks error 103 (Online Banking Issue)

Stage 2: Disconnecting Your Bank Account 

Have a look at the steps below to disconnect your bank account. 

  1. Begin the process by choosing the Banking menu or Transactions menu. 
  2. There on, pick the blue blank square for the account you wish to disconnect. 
  3. Afterwards, hit the Edit icon in the tile for the bank account you need to update. Later on, choose the Edit Account Info tab. 
  4. You must tick mark the checkbox next to the Disconnect this account on save option. 
  5. End the procedure by tapping the Save and Close button. 

Stage 3: Reconnect Your Bank Account 

  1. To connect the bank account in QuickBooks, move to the Banking section. 
  2. After this, navigate to the Transactions menu and choose the Bank Accounts option.
  3. Thereon, pick the highlighted Link Account option to proceed further.
  4. At last, follow the steps carefully to reconnect the account to online banking. 

Related article- Fix QuickBooks Something’s Not Quite Right Error

Final Thoughts!!

We will ensure that the solutions listed in this post will help you resolve QuickBooks Error 1000. However, if you have any further queries related to this error, you are free to get in touch with our professionals via the live chat facility for a quick resolution.  QuickBooks Error 1000 because of the corrupted data. However, the users are supposed to bring compatibility between Windows and QuickBooks applications to access the files easily. 

Afraid of Getting QuickBooks Payroll Error PS077? Fix It With Ease

Are you looking for payroll software that can confidently tackle all your payroll-related tasks? Here comes a time when QuickBooks Payroll comes into the picture. Using the QuickBooks payroll, it has become more convenient to pay the employees on the same day and file the taxes on time. But, at times, users might stumble upon QuickBooks Payroll Error PS077 while downloading the latest payroll updates due to the old billing data. 

You may also see the QuickBooks PS077 Payroll Error due to the inactive payroll subscription. Consequently, this error prevents the users from updating the tax table. Therefore, rectifying the error immediately is mandatory using the troubleshooting methods discussed below. 

Wondering how to deal with the complicated QuickBooks Payroll Error PS077 alone? Contact us at +1-833-460-2030 and get the best possible solutions to figure out the issue quickly. 

Error Fix it now

A Quick Introduction Of QuickBooks Error PS077 

Usually, the users might come across QuickBooks Error PS077 while installing the most recent version of the payroll updates. On the appearance of the error, the users will be displayed the error message indicating: 

“Error PS077 When Downloading Payroll Updates 

A user has not registered QuickBooks software, or the Company File is damaged or corrupted”.

Error PS077 When Downloading Payroll Updates

Other factors responsible for the error are inadequate, poor internet connection, or damaged company files. If you are also struggling with the same error, fix it easily using the troubleshooting methods discussed below. 

Read More- QuickBooks Payroll Error PS038: How to Resolve and Prevent

What are the Reasons That Might Result in Error PS077 in QuickBooks?

It is important to find out the major causes that may trigger Error PS077 in QuickBooks so that you can resolve the issue smoothly. Therefore, we have elaborated on some root causes below to let you understand them properly. 

  1. There might be the possibility that the QuickBooks company file you are using is either damaged or corrupt. 
  2. You might be working on the QuickBooks Desktop version, which is not available anymore. 
  3. Sometimes, it might trigger when you have listed the wrong billing details. 
  4. In other cases, it may happen when you haven’t registered your QuickBooks software. 

Resolve Error PS077: QuickBooks is having Trouble Installing Updates for Payroll Tax Tables Using These Simple Methods. 

Herein, we have described all the best effective solutions to resolve Error PS077 in QuickBooks easily. Ensure that you follow the steps in the same manner as illustrated below.  

Resolution Way 1: Cross-Check Your Billing Information 

Most of the time, the users might end up with QB Payroll Error PS077 because of the wrong billing details. Therefore, it is essential to re-check that you have updated the billing details using the steps instructed below. 

  1. First, launch your device’s QuickBooks Desktop and hit the F2 key to redirect you to the Product Information window. 
  2. After that, besides the License Number, ensure you see the status as “Activated.”
  3. However, you must register your QuickBooks Desktop if it is not activated. 
  4. Once the registration is completed successfully, you must update the QuickBooks Desktop to the most recently launched version.

Resolution Way 2: Download the Latest QuickBooks Payroll Tax Table Update

 You must follow the instructions below to download QuickBooks’s latest payroll tax table

  • Initially, move to the QuickBooks Employees menu and choose the Get Payroll Updates option. 
QB Payroll tax table
  • Also, you must try resetting the QuickBooks update and then proceed further. 
  • Thereon, mark the checkbox next to the Download Entire Update option. 
  • Following this, choose the highlighted Download Latest Update option
  • Consequently, you will be displayed with a window telling you once the download is over. 

Related article- Best Ways to Update QuickBooks Desktop to latest release

Resolution Way 3: Fix The Damage in Your QuickBooks Desktop Application 

  1. To start the process, relaunch your device and shut down if any application obstructs QuickBooks. 
  2. Afterwards, hit the Windows key and write Control Panel within the search panel. 
  3. Once you reach the Control Panel window, select the Programs and Features. 
  4. Thereon, if necessary, you must hit the Uninstall a Program option. 
  5. In the next step, hit Uninstall/Change from the list of programs available to remove the QuickBooks application. 
  6. Furthermore, hit the Continue tab followed by the Next button.
  7. You are supposed to click Repair > Next and then wait until the repair process is completed. 

Summing It Up!!

Through this post’s help, we hope you can easily troubleshoot QuickBooks Payroll Error PS077. If you still have difficulty installing the latest payroll tax table update, connect with professionals at +1-833-460-2030 for quick resolution. They will listen to your query and offer you some useful tips to tackle the error quickly. 

Detailed Insights About QuickBooks Connection Diagnostic Tool

Are you also the one who is struggling with network connectivity issues in QuickBooks and is unable to access the data file stored in the workplace? If yes, this is when QuickBooks Connection Diagnostic Tool comes into play. With the help of this tool, you can easily tackle the complicated company file issues, network issues, or errors you may face while working in multi-user mode. 

QuickBooks Connection Diagnostic Tool  Setup

Moreover, by using the connection Diagnostic tool QuickBooks, you can save precious time dealing with complex QuickBooks errors. However, read this post thoroughly to obtain in-depth information on downloading, installing, and using this tool.

Need more technical knowledge to operate the QuickBooks Connection Diagnostic Tool? Call us at +1-833-460-2030 and have a conversation with our professionals to solve the queries instantly. 

Error Fix it now

Errors You Can Fix Via QuickBooks Network Connection Diagnostic Tool 

Do you need to learn about the facts regarding which errors you can fix using the QuickBooks Network Connection Diagnostic Tool? If yes, then we have described all those errors below. Check them out and get your issues resolved quickly using this tool. 

  1. You can tackle the multi-mode errors such as H101, H202, and H505
  2. The users can also resolve the QuickBooks 6000 series of errors associated with the company file, like 6150, 6000 82, 6000 31, 6147, and 6103
  3. Vendors and Customer lists in the QuickBooks application must go blank. 
  4. You can fix the issues if you find any missing entries in the Employees List. 
  5. Also, you can resolve the QuickBooks Errors such as QuickBooks Error 1722, 1311, 1603, 1723, and 1336
  6. Moreover, it also helps to deal with firewall port issues in Windows and fix the damage in the Windows Registry. 

Easy Way To Get the Latest QuickBooks Connection Diagnostic Tool Download

Herein, we have discussed some simple instructions that you must follow to get the most recent version of the QuickBooks Connection Diagnostic Tool download

  1. Initially, you must reach the Intuit’s official website using your preferred web browser to download the QuickBooks Connection Diagnostic Tool.
  2. After this, you must search for the file name QBInstall_Tool_vs.exe file
  3. Once you get the file, download it instantly on your preferred operating system. 
  4. In the meantime, you must ensure you are well-connected with a high-speed internet connection throughout the download process. Also, you mustn’t shut down the system until the installation is completed. 

Installation of the Previously Downloaded QuickBooks Connection Diagnostic Tool

Once you have successfully downloaded the QuickBooks Connection Diagnostic tool, use the steps listed below to install them to your device.

  • Before you begin the installation, confirm that you have yet to previously install any QuickBooks Connection Diagnostic Tool version. 
  • For instance, if you find any version already available, use the Control Panel to uninstall it immediately. 
  • After this, access the downloaded section using your keyboard’s Ctrl + J keys. Look for the downloaded setup file and double-tap on it to open. 
  • Also, you must confirm that you have \closed all the processes interrupting in the background to avoid further discrepancies. 
  • There on, you must thoroughly read the License Agreement and agree to the terms mentioned for using the tool. Later on, hit the Next button to proceed further. 
license agreement of the software
  • Afterwards, act according to the instructions on the screen and keep tapping the Net button until the installation part is over. 
  • Once the installation ends, you must set up the QB Connection Diagnostic Tool by accessing the directory. 
  • Furthermore, you are supposed to include the Admin Password in the required text field accurately and then hit the OK button to move further. 
  • Finally, you must pick any of the following options between Host System or Workstation according to your preference. Later on, you can use this tool to eradicate all the issues smoothly. 

Essential Points You Must Consider Before Running the QuickBooks Connection Diagnostic Tool. 

Before you continue using the QuickBooks Connection Diagnostic Tool, you must keep the following things in mind. 

  • The users must ensure their system is well-linked with a high-speed internet connection. 
  • Don’t skip to take the backup of the QuickBooks company file to an external device like a USB or a Flash drive
  • Also, you must ensure you have installed the latest version of the QuickBooks Desktop on your device. 
  • The QB Connection Diagnostic Tool only operates well with the new versions of the QuickBooks 2008 on Windows 7, XP, and Vista. 
  • Also, you may generate a local backup using the QuickBooks application by choosing the File menu > Company File > Create Local Backup
Backup-of-the-Company-File-and-Payroll-Data
  • You must install the latest version of the Microsoft components and C++ Framework on your device. 
  • Moreover, the users can also prevent the consequences of damaged company files by preparing a duplicate copy of the QuickBooks file on their device. 

What are the Steps to Setup Connection Diagnostic Tool in QuickBooks?

Go through the procedure described below to set up the Connection Diagnostic Tool in QuickBooks hassle-free. 

  1. To start the procedure, tap on the QuickBooks icon from your desktop and then hit the Utilities option.
  2. Afterwards, choose the Repair File option followed by the Network Problems. 
  3. Thereon, hit the Yes button to permit collecting personal information regarding QuickBooks and its data. 
  4. Furthermore, you must browse the folder with your data file and launch the affected file. 
  5. Next, choose the highlighted Show Advanced Options, and it will present a list of items in a drop-down that will be displayed on the screen. 
  6. You should select the issue you are facing and add the valid QB login ID and password into the respective text field. 
  7. The user is supposed to wait until the QB Connection Diagnostic Tool diagnoses the issue and fixes the issue in the company file.
  8. In the end, once your file is repaired, re-open it and continue with your work. 

What Should I Do To Use The QuickBooks Connection Diagnostic Tool? 

You can use the steps below to use the QuickBooks Connection Diagnostic Tool easily. 

Stage 1: Verify The Connection Tab 

Using this tab, you can verify the system setup and confirm that you can run the company file in any other system in single-user and multi-user modes. Usually, the users might encounter errors when the users don’t have enough permissions, or the ports or system firewall is blocked.

Stage 2: Test Connectivity:- 

With the help of this tab, the users can scan and check your system’s connectivity. 

Stage 3: Do the Investigation of Your Firewall’s Status:- 

The Firewall Status tab will provide you with the basic instructions regarding the system firewall.

What Should Be Done to Verify the Computer’s Connectivity?

The users can easily test the computer’s connectivity with the help of the following steps.

  1. Initially, you must look for the QuickBooks data file by tapping its icon beside the Company File field. 
  2. You must utilize the Linux System when the network is available in the Alternate mode. Apart from this, ensure you have marked the Change Hosting Server checkbox. 
  3. After that, before you check the connectivity, confirm the status is “Not Applicable.” 
  4. Once you run the test, you must confirm that the status must be displayed in Green. This status states that no threats are detected; on the other end, the red symbol indicates a threat in your device. 
  5. Later on, hit the highlighted test Connectivity option. 
  6. Subsequently, if you notice that the connectivity is shown in Red, it signifies that your test has failed. Moreover, you will see that the Advanced Section will represent all the places that are checked. 
  7. You must choose the highlighted “What do these mean?” tab to gather more details. 
  8. Once your issue is resolved properly, it is important to run the Diagnostic tool to spot whether there are any other issues. 
  9. The QB Connection Diagnostic Tool might take some time to wind up and fix the issues. However, the time taken to repair the issue entirely depends upon the internet’s speed and the company’s file size. 

Final Thoughts!!

We hope that now it has become more convenient to deal with the errors related to the company file, network connectivity, or multi-mode errors; you can fix them via the QuickBooks Connection Diagnostic Tool. However, if you still have doubts, you can quickly connect with our professionals at via live chat. They will assist you with useful tips to figure out the issue instantly. 

Rectify QuickBooks Payroll Error PS032 Using These Fruitful Solutions

When it comes to trustworthy payroll software that can manage all your tasks, from creating paychecks to processing the employee’s payroll, QuickBooks is one of the top-leading software. But, in certain scenarios, users might confront QuickBooks Payroll Error PS032 while getting the latest payroll update. This error is mainly triggered using an expired or invalid QuickBooks payroll subscription. 

As a result, the QuickBooks Error PS032 prevents the users from accurately calculating the payroll and may hamper the workflow. Therefore, it is crucial to figure out the issue quickly using the best resolution methods explained in the post. 

If you want an expert’s opinion to figure out QuickBooks Error PS032, then you must call our experts at +1-833-460-2030 and get all answers to your queries within the shortest time possible. 

Error fix it now

What Do You Mean By QuickBooks Error PS032? 

The QuickBooks Error PS032 belongs to the PSxxx series of errors associated with the payroll update error. This error is mainly triggered when there is improper registration of the QuickBooks software, or you have added the wrong billing details. On the occurrence of the error, the users might get the error message on the screen stating: 

“[PS032] QuickBooks cannot read your payroll setup files. Note the message number at the beginning of this message and click Help for troubleshooting tips to resolve the problem”. 

Error PS032 error message

Other factors that may trigger QuickBooks Error PS032 are issues related to internet connection or damage in the payroll tax table file. However, it is important to fix the payroll update error in QuickBooks so that you can install the latest payroll updates to process the payroll accurately per the latest payroll tax table

What are the Factors Responsible For QuickBooks Payroll Update Error PS032?

The users might come across QuickBooks Payroll Update Error PS032 for many reasons. So, to give you a clear picture of all those causes, we have discussed a few below. Check out all the reasons and find what’s causing you trouble while updating the payroll. 

  1. Damage in the QuickBooks Registration file is one of the reasons that may arise QuickBooks Error Code PS032. 
  2. Another reason may be damage to the CPS folder. 
  3. There might be the possibility that you haven’t registered your QuickBooks software. 
  4. You have added the wrong user details when subscribing to the payroll services. 

Related article- Getting QuickBooks Payroll Error PS038? Apply These Reliable Fixes

Tips You Must Know Before Fixation Of PS032 Error in QuickBooks Desktop

One must remember certain important points to resolve the PS032 Error in QuickBooks Desktop easily. 

  1. Confirm that you are using the valid QuickBooks Payroll subscription. 
  2. Also, you must ensure you have updated all your Billing details regarding your payroll account in QuickBooks. 
  3. Don’t forget to generate a backup of your QuickBooks data file to keep your sensitive business data safe from unauthorized access. 

Read More- [Fixed] QuickBooks Scheduled Backup Not Working?

Learn How to Fix Error PS032: QuickBooks Cannot Update Your Payroll Tax Table.

Once you know the possible causes behind the Error PS032 QuickBooks, you can easily fix the error using the solutions listed below. So, look at all the troubleshooting methods listed below to resolve the issue effortlessly. 

Resolution Way 1: Edit the Name of the CPS Folder 

Sometimes, the users might result in QuickBooks Error PS032 due to damage in the CPS folder. So, to repair the damage in the folder, you must repair it using the steps below. 

Rename the CPS Folder
  1. Begin by opening the Windows File Explorer using the Windows + E keys together. 
  2. After that, tap on the “This PC” option and click Local Disk C
  3. You are supposed to run Program Files (x86) and then the Intuit folder. 
  4. Thereafter, the users have to access the QuickBooks desktop folder that matches that tallies with the version you are currently using. 
  5. Afterwards, hit the Components button and then opt for the Payroll Folder. 
  6. Furthermore, right-click on the CPS folder and hit the Rename option. Later on, you must add a new folder name according to your preference, which is distinct from the previous one. Then, you are supposed to hit the Enter key to save the name successfully. 
  7. Finally, turn off the User Account Control settings by picking the Never Notify option. 
  8. Once you finish the process, you must try to get the latest QuickBooks payroll again by relaunching the software. 

Resolution Way 2: Look At Your Payroll Service Subscription 

Another way to resolve the QuickBooks PS032 Error is by validating your QuickBooks Payroll subscription. For that, you must utilize the steps outlined below. 

  1. In the first place, launch the QuickBooks application and then navigate to Employees
  2. After this, you must pick the My Payroll Serviced option from the list of options. 
  3. In the next step, hover your cursor over the Manage Service Key and check the Service Name and status. 
  4. Also, the users must verify that the status is denoted as Active. 
  5. Thereon, tap on the Edit option to look for the Service Key Number
  6. Afterwards, include the Service Key Number accurately in the respective text field. 
  7. Furthermore, hit the Next button and ensure you have unmarked the Open Payroll Setup checkbox. 
  8. At last, hit the Finish option to see the complete payroll update. 

Resolution Way 3: Try Activating and Installing the Latest QuickBooks Desktop Update 

Even after using the above methods, QuickBooks Payroll not updating, then use the instructions below to activate and update the QuickBooks Desktop. 

  • Primarily, launch the QuickBooks Desktop application and hit the F2 key from the keyboard to bring the Product Information window
  • Thereafter, check that you see the message Activated beside the License Number. If you don’t see the message Activated, perform the below steps.
    1. Move to the QuickBooks Help menu and tap the Activate QuickBooks Desktop option. 
    2. After this, verify the details for the application registration using the instructions given on the screen.
    3. Shut down the QuickBooks application to relaunch your desktop.
    4. Press the Windows key and then write QuickBooks to open on your device.
    5. Right-click on the QB icon and pick the Run as Administrator option.
    6. As a result, it will redirect you to the No Company Open window.
  • Later on, go to the Help menu and opt for Update QuickBooks Desktop.
Update QuickBooks Desktop
  • Thereon, hit the Options button and tap on Mark All, followed by the Save button.
  • In the next step, proceed to the Update Now option and verify that you have selected the Reset Updates checkbox. 
tap on Update Now Option When Updating QuickBooks
  • Conclude the entire process by hitting the Get Updates button. 

To Put It All Together!!

Hopefully, we assure that the above-listed resolution methods will help you tackle QuickBooks Payroll Error PS032. If you still have any expert opinion regarding this issue, you can get help from our professionals via the live chat facility. They will look into the matter deeply and offer useful tips to eradicate the error instantly. 

QuickBooks Payroll Tax Table Update: What You Need to Know

Installing the most recent QuickBooks Payroll tax Table Updates on the device is important when filing taxes using the QuickBooks. The latest updates make it easier for businesses to make the proper calculations supported by provincial and federal tax tables. However, to get the latest tax table update, the users have a valid QuickBooks Desktop payroll subscription to file the taxes easily. 

If you are also struggling to get a proper method to get the detailed procedure to get the latest tax table in QuickBooks Desktop, this is the post you are looking for. Read this write-up thoroughly to get the complete information and calculate the taxes accurately.

Looking for immediate help to get the most recent tax tables in QuickBooks? Contact us at +1-833-460-2030 and let our professionals handle them independently. 

Error Fix it now

What Must You Know Before Installing the Newest Payroll Tax Table Update in QuickBooks Desktop?

Here are some essential points you must remember to get the newest payroll tax table update in QuickBooks Desktop downloaded smoothly on your device. 

  1. Firstly, ensure that you must have a valid QuickBooks Payroll subscription to get the latest payroll tax table update.
  2. You must have good and uninterrupted internet access to hassle-free download the latest updates. 
  3. Also, you are advised to get the most recent updates of tax tables within at least 45 days. Otherwise, you may also get the updates every time a payment is made to the employees. 
  4. Apart from this, you also have to turn on the automatic updates feature within the QuickBooks Desktop. Doing so will automatically provide you with the payroll tax table updates once the updates are launched. 

Read More- Best Ways to Update QuickBooks Desktop to the newest release

Easy Ways to Verify Your Current Version Of QuickBooks Payroll Tax Table Update 

The latest QuickBooks Payroll Tax Table Update version available for the QuickBooks Desktop 2023 edition is 11833003. This release will be effective from June 1, 2023, to December 31, 2023. However, to verify whether you have the latest payroll tax table update, perform the steps outlined below. 

  • Launch the QuickBooks application and tap on the Employee menu to start the process. 
Click on the Employee menu to start the process
  • After this, hit the My Payroll Service and the Tax Table Information tab. 
  • Thereon, you will see that the First Three Numbers represented beneath the You are Using Tax Table Version column will signify your tax table version, 118833003.
  • Conversely, if you previously used the updated version of the payroll tax table, you already have release 118.

How to Get the Newest Payroll Tax Table Update in QuickBooks Desktop?

If you already subscribe to QuickBooks Payroll, you can obtain the newest payroll tax table update in QuickBooks online. However, it is important to download the latest payroll tax table update to continue filing taxes hassle-free.

Furthermore, if you are looking for the proper steps regarding how to update payroll tax table in QuickBooks Desktop, then you must carry on with the steps written below.

1. To commence, choose the Employees tab and hit the highlighted Get Payroll Updates option.

open Get Payroll Updates tab

2. After this, you must navigate to the Download Entire Payroll Update option.

3. Proceed further by tapping on the Update button.

4. Once you are all set with the downloading part, you will receive a pop-up message indicating, “A new tax table and updates to your payroll tax forms have been installed on your Desktop. Click OK to read about the modification.”

5. After reading the prompt carefully, hit the OK button, and you are all set to go.

Related Article- QuickBooks Payroll Error PS038: How to Resolve and Prevent

Simple Process to Install the Most Recent Updates of Tax Tables Through CD (Disk Delivery Service)

Follow the procedure explained below to install the most recent updates of tax tables in QuickBooks through CD. 

  • In the initial stage, the user is supposed to insert the “Payroll Update CD” into the CD drive of your device. 
  • Afterwards, choose the Get Payroll Updates option to proceed to the next step. 
  • Thereon, the QuickBooks Desktop Professional and Premier Users have to tap on the Employees option > Get Payroll Updates option. 
tap on the Employees option > Get Payroll Updates option
  • In the next step, if the user is asked to find the “update.dat” or “data.file” within the “Install Payroll Update window,”. In that scenario, the users must perform the mandatory actions and then act according to the instructions given on the screen. 
  • Once you are all set, hit the highlighted Browse option and move towards the next step. 
  • Next, you must choose the CD Drive option from the Install window by clicking “Look in the drop-down arrow”. 
  • Furthermore, you must either opt for “date or update3.dat” from the “Payroll Update Disk” and hit the Open button. 
  • Now, choose any option, i.e, “update.dat” or “update3.dat” option. 
  • Later on, you must hit the Open option. 
  • Finally, move to the Payroll Update window to tap the OK button. 

New Features that Are Included With the Latest Payroll Tax Table Updates in QuickBooks

With the effect of the latest update launched in July 2023, you can see numerous TD1 changes from the January 2023 payroll tax table update.

View the Current TD1, CPP, and EMI Amounts. 

Effective Date7/1/20231/1/2023
Tax Table Version118117

TD1 Amounts

Canada Pension Plan (CPP) – Outside QUEBEC 

Effective Date7/1/20231/1/2023
Tax Table Version118117
Maximum Pensionable Earnings66,00066,000
Basic Exemption3,5003,500
Contribution Rate5.95%5.95%
Maximum Contribution (EE)3,754.453,754.45
Maximum Contribution (ER))3,754.453,754.45

Employment Insurance (EI) – Outside Quebec

Effective Date7/1/20231/1/2023
Tax Table Version118117
Maximum Pensionable Earnings61,50061,500
Premium EI Rate (EE)1.63%1.63%
Premium EI Rate (ER) (1.4*EE)2.28%2.28%
Maximum Premium (EE)1,002.451,002.45
Maximum Premium (ER)1,403.431,403.43

Quebec Pension Plan (QPP) 

Effective Date7/1/20231/1/2023
Tax Table Version118117
Maximum Pensionable Earnings66,60066,600
Basic Exemption3,5003,500
Contribution Rate6.40%6.40%
Maximum Contribution (EE)4,038.403,776.10
Maximum Contribution (ER)4,038.403,776.10

Employment Insurance – (Quebec Only)

Effective Date7/1/20231/1/2023
Tax Table Version118117
Maximum Insurable Earnings61,50061,500
Premium EI Rate (EE)1.27%1.27%
Premium EI Rate (ER) (1.4*EE)1.778%1.778%
Maximum Premium (EE)781.05781.05
Maximum Premium (ER) (1.4*EE)1,093.471,093.47

Quebec Parental Insurance Plan (QPIP) 

Effective Date7/1/20231/1/2023
Tax Table Version118117
Maximum Insurable Earnings91,00091,000
Contribution Rate (EE)0.49%0.49%
Contribution Rate (ER) (1.4*EE)0.69%0.69%
Maximum Contribution (EE)449.54449.54
Maximum Contribution (ER) (1.4*EE)629.72629.72

Commission Des Norms Du Travail (CNT) 

Effective Date7/1/20231/1/2023
Tax Table Version118117
Maximum Earnings Subject to CNT 91,00091,000

How to Fix QuickBooks Desktop Payroll Tax Table Update Errors?

Even after installing the latest QuickBooks Desktop Payroll tax table update, you notice that the TD1 amounts still need to be updated, you must carry on with the following steps. 

  1. Initially, the users are supposed to verify that they have installed the latest QuickBooks payroll tax table update on or after the release date. For instance, if the user has downloaded the update version 118 on or after June 15, 2023. In that scenario, you won’t be able to find the tax tables until it become effective on July 1, 2023. If, after the release date, you install the updates, then you will get the latest tax table updates. 
  2. In case you have manually made the changes in the TD1 amounts for an employee in QuickBooks, then the new table will not modify the previously added amounts. All you need to do is to include the TD1 amounts, which are going forward manually. 
  3. There on, you must verify whether any employee has set up the TD1 amounts. This is so because the QuickBooks Desktop will automatically update those TD1 amounts for employees with the basic amounts for last year’s tax tables. 

Taking Everything Into Account… 

Getting the latest QuickBooks Payroll Tax Table Update is important for accurate tax filing and avoiding late tax penalties. However, we hope the above process will help you install the latest tax table updates. If you encounter any difficulty while getting the payroll tax table updates, then have a conversation with our professionals at +1-833-460-2030 for sure-shot solutions. 

QuickBooks Tool Hub – One-Stop Solution For All the QB Errors 

QuickBooks has become necessary for every small to medium-scale business as it delivers avant-garde and top-notch accounting solutions to simplify business accounting tasks. Undoubtedly, it is an amazing accounting suite, but it is still vulnerable to certain technical snags. So, to deal with all the minor issues in the accounting software, you can use the QuickBooks Tool Hub (1.6.0.3) version and run the software smoothly.

Now, the users utilize QuickBooks Repair Tool Hub, one tool to deal with company files, programs, and network-related and printing issues. To gather more details about downloading, installing, and using this utility, you must stick to this post for proper understanding. Let’s start reading it. 

Want in-depth information regarding all the new features of QuickBooks Tool Hub? If yes, then ring us at +1-833-460-2030 and talk to our executives to get the best possible assistance without wasting much time. 

What’s All You Need To Know About QuickBooks Tool Hub? 

QuickBooks Tool Hub is a multi-functional tool that Intuit designs to deal with issues associated with programs, networks, company files, QuickBooks crashing, or print-related errors. In short, it offers numerous tools to deal with all the minor glitches you face while working in QuickBooks under one roof. 

QuickBooks tool Hub Icon

Moreover, the QB Tool Hub combines multiple tools, including File Doctor, Condense Data Utility, QuickBooks PDF and Print Repair Tool, QuickBooks Install Diagnostic Tool, and so on. This user-friendly tool has a simple interface that you can utilize easily to terminate complicated issues without hassle. 

Why Is it Beneficial to Download QuickBooks Tool Hub? 

Undoubtedly, QuickBooks is known for delivering top-notch accounting features and functions to simplify financial tasks. But, at times, while running the software, the users might get stuck with different errors. As a result, it might stop the users from continuing with their ongoing business tasks. 

However, to tackle minor technical snags in QuickBooks, you should get QuickBooks Tool Hub Download 2023 edition. It is a one-stop solution that deals with company file issues, multi-user mode errors, network-related issues, etc. Apart from this, multiple other reasons are responsible for the error. 

  1. The best part of using the Tool Hub is that it comprises an easy-to-use interface, which makes it much easier to use the tool to fix issues instantly. 
  2. Now, the time has gone when you have to download separate tools to fix PDF and print-related errors, company file issues, and network-related and program issues. You can fix all the issues under one roof by getting the QuickBooks Tool Hub Windows 10 Download on your device.  
  3. You don’t have to pay additional charges to purchase this utility as you can get the latest version of QuickBooks Tool Hub (1.6.0.3) Free Download and use it to repair minor glitches while running the software. 
  4. Also, the QB Tool Hub is an outstanding tool that helps users tackle issues related to business concerns. 

What Are the Different Errors That You Can Rectify Using QuickBooks Tool Hub?

You can tackle the following errors using the QB Tool Hub for Windows 11.

  1. You can easily tackle the issue faced while installing QuickBooks Desktop that may occur due to some missing components, such as Microsoft .NETFramework.
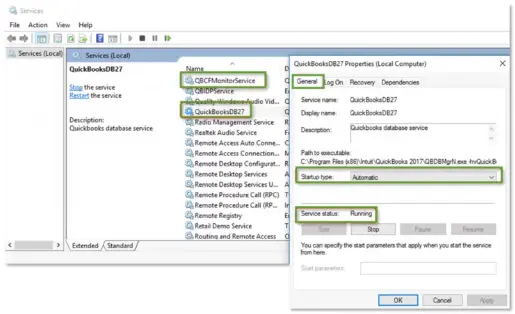
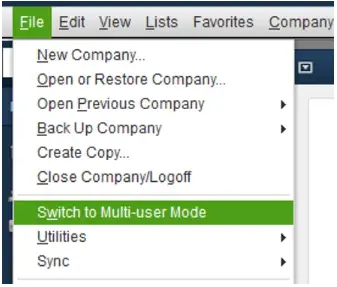
  2. Also, the users can figure out the multi-mode errors in QuickBooks, such as QuickBooks Error Code H202
  3. Network-related issues that may trigger due to improper network configuration can also be rectified.
  4. In other instances, the user may also tackle errors like QuickBooks has crashed due to a corrupt hard disk. 
  5. You can also deal with the issues related to the PDF and print-related issues.
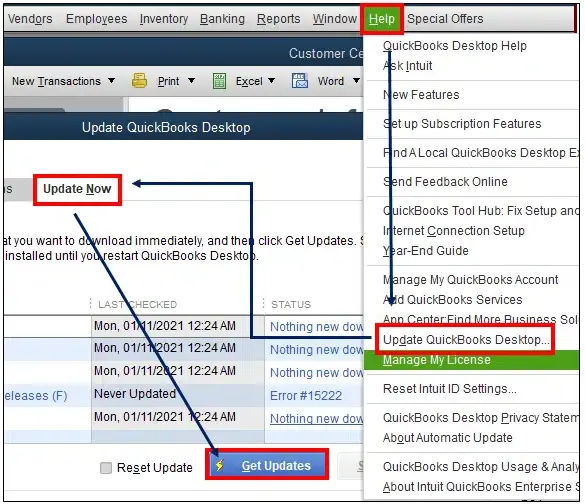
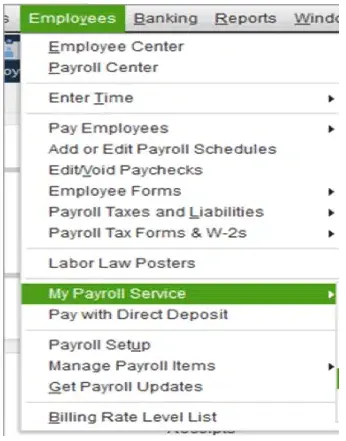
  6. The users can also resolve the QuickBooks Payroll update errors of 15XXX series.
  7. Using the Tool Hub QuickBooks, you can also fix QuickBooks error Code 2002, QuickBooks Error 3371 Status Code 11118, QuickBooks Enterprise errors, and QuickBooks Desktop Update Errors.

Prerequisites Required Before You Install the Intuit QuickBooks Tool Hub Download

Before you get the latest Intuit QB Tool Hub Download on your device, you must verify that your system can run the tool smoothly. 

  1. First, you must confirm that your system is getting a proper internet network connection.
  2. You must be working on an updated version of the Windows operating system.
  3. Also, you must require Microsoft .NETFramework and Microsoft Visual C++ Redistributable package.
  4. The users must have proper administrative credentials to install the software uninterruptedly.

Want to Get the Latest QuickBooks Tool Hub (1.6.0.3) Download? Here’s What to Do. 

You must perform the instructions written below in the same manner as prescribed below to get the latest QuickBooks Tool Hub Download on your device hassle-free. 

  1. Start downloading the QuickBooks Tool Hub by visiting the official Intuit page using your preferred web browser. 
  2. You have to wait for a few seconds until the QuickBooks Tool Hub gets downloaded on your device. 
  3. In the meantime, you must not switch between the windows and ensure that you don’t shut down the download window until the process ends. 
  4. Once it gets downloaded, it will prompt you to save the file. You must restore the file from where you can get it easily, say on your Desktop. 

Learn More About the QuickBooks Tool Hub Install Procedure

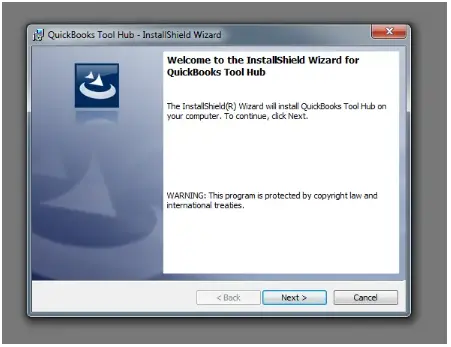
Now, that you have downloaded the most recently launched version, proceed further towards the QuickBooks Tool Hub Install part. For that, you must use the steps illustrated below properly to avoid further discrepancies. 

  • In the first place, hit the Ctrl + J keys together to move to the Download section. Otherwise, if you have changed the location, browse to that location to open the QuickBooks Tool Hub.exe file
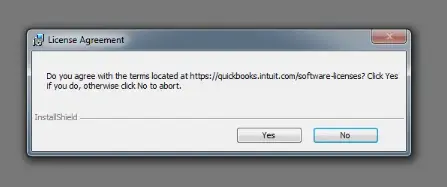
  • After this, thoroughly review Intuit’s License Agreement, and if you consent to the tool’s installation, hit the Yes button. 
Intuit's License Agreement
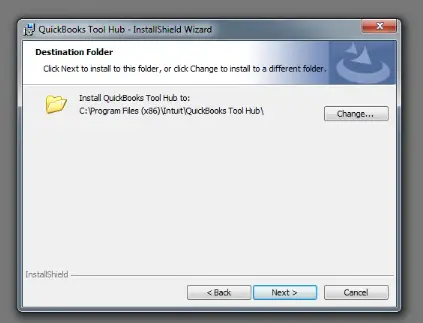
  • Thereon, choose the QuickBooks Tool Hub Install Designation folder and then tap the Next button. 
Click next to install to this folder
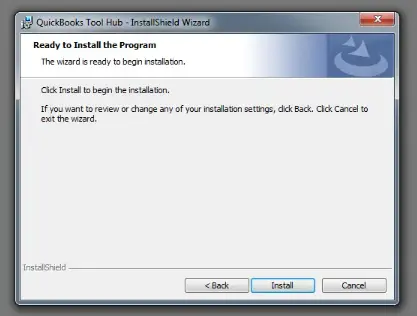
  • Soon after this, choose the highlighted Install tab to initiate the installation process. 
click Install to begin the Installation
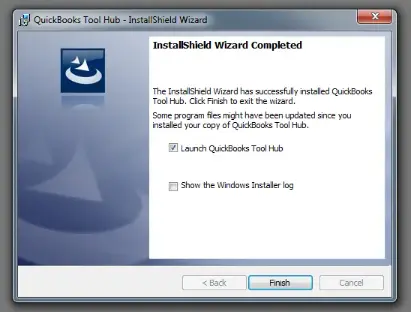
  • Furthermore, tap the Finish button, and then the QB Tool Hub will open up on your device. 
Click Finish to exit the wizard

Discussing Different Tools Present in Tool Hub QuickBooks and Its Usage 

In this blog’s section, you will learn about the tools available in Tool Hub QuickBooks and their usage in detail. Check them out. 
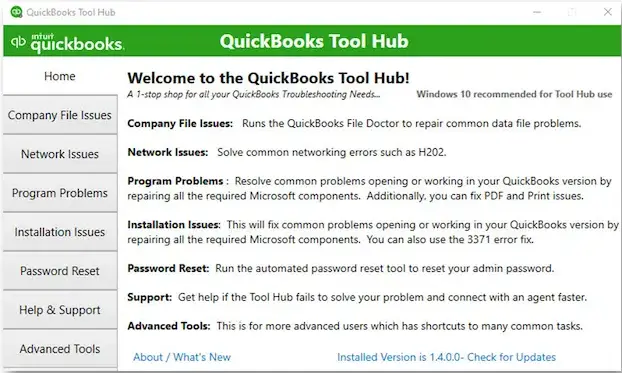
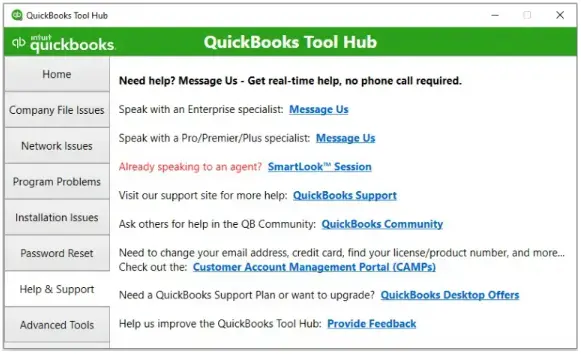
1. Home Tab:-

Home tab of QuickBooks Tool Hub

It is the main interface of the QuickBooks Tool Hub, which is displayed on the screen whenever you launch the application. This window carries all the essential details associated with the Tool Hub and how it can use its different components for certain purposes. 

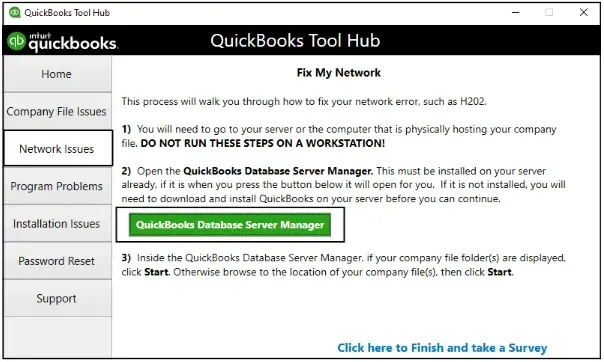
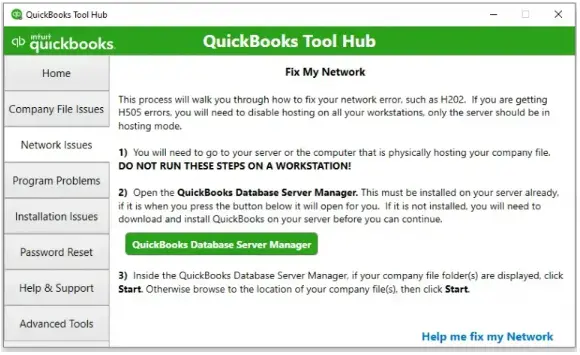
2. Network Issues Tab:- 

Tap on Network issues in QuickBooks Tool Hub

You must choose the Network Issues tab to figure out whether there are any network-related issues. Moreover, using this tab, you can figure out the QuickBooks multi-mode error H202 and other connectivity issues. Apart from this, it also enables the users to access the QuickBooks Database Server Manager

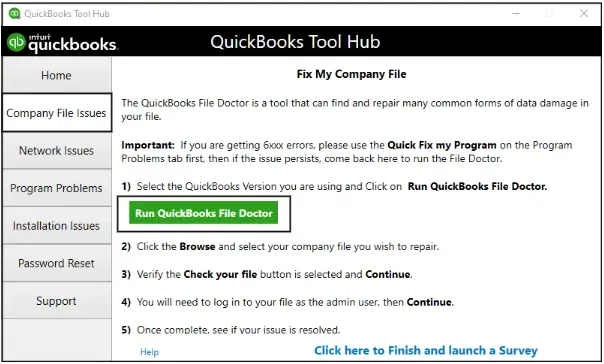
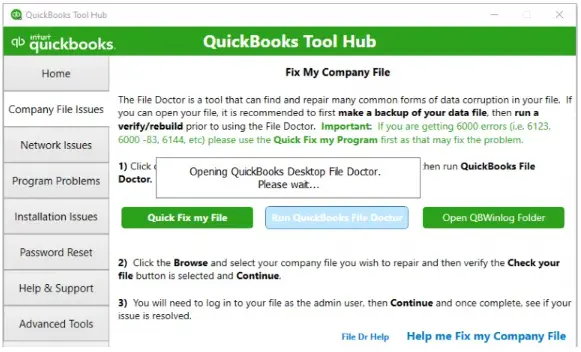
3. Company File Issues Tab:- 

If you spot certain minor glitches within your QuickBooks company file, you can use the Company File Issues tab to fix the issue. Apart from it comprises three different components, which are as follows. 

Fix My Company File issue
  • Quick Fix My File:- The users can put this tool into use to tackle minor issues with the QuickBooks data file. It will conduct a quick run on the data files and resolve if there is any data damage. 
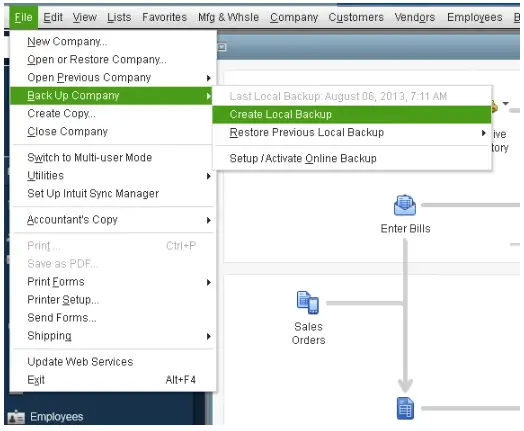
  • QuickBooks File Doctor Tool:- This tool is mainly designed to repair the corruption or damage to the QuickBooks company file. However, before running this tool, it has been suggested that you must schedule the backup of the data file to avoid data damage. 
  • Open QBWin.Log Folder:- Using this tab, the users can easily access the QBWin.log file, which helps you find out the exact cause behind the errors traced in the QuickBooks data file. 

4. Password Reset:- 

No matter how well your memory is, it’s a human tendency to forget little things. Especially when the user needs to remember passwords for multiple online platforms, sometimes, they may also become the victim of cyber attackers when they use your QuickBooks account without your permission. In that scenario, you can utilize the Password Reset Tool to deal with certain problems. 

5. Help & Support Section:- 

Help & Support Section

It’s quite obvious that the users might face certain issues while running the QuickBooks Tool Hub. In that scenario, you only need to consult with our QuickBooks professionals to clarify your doubts. By clicking on the Support tab, you can contact the team of QuickBooks professionals through different modes and resolve all your queries. 

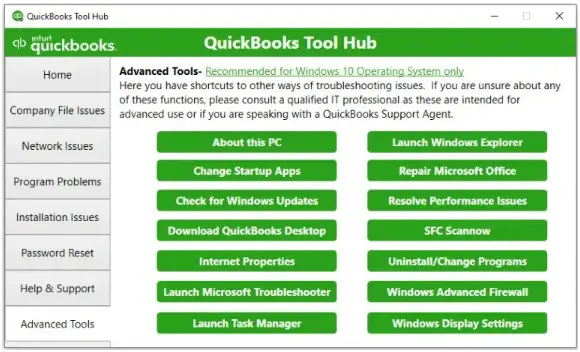
6. Advanced Tools Section:-

Advanced Tools Section

If you encounter any issues other than QuickBooks, including outdated operating systems, repair Microsoft Office, Windows Advanced Firewall, performance issues, etc. You can resolve them all using the Advanced Tools tab. In short, you can resolve multiple issues under one roof to run the QuickBooks Tool Hub smoothly. 

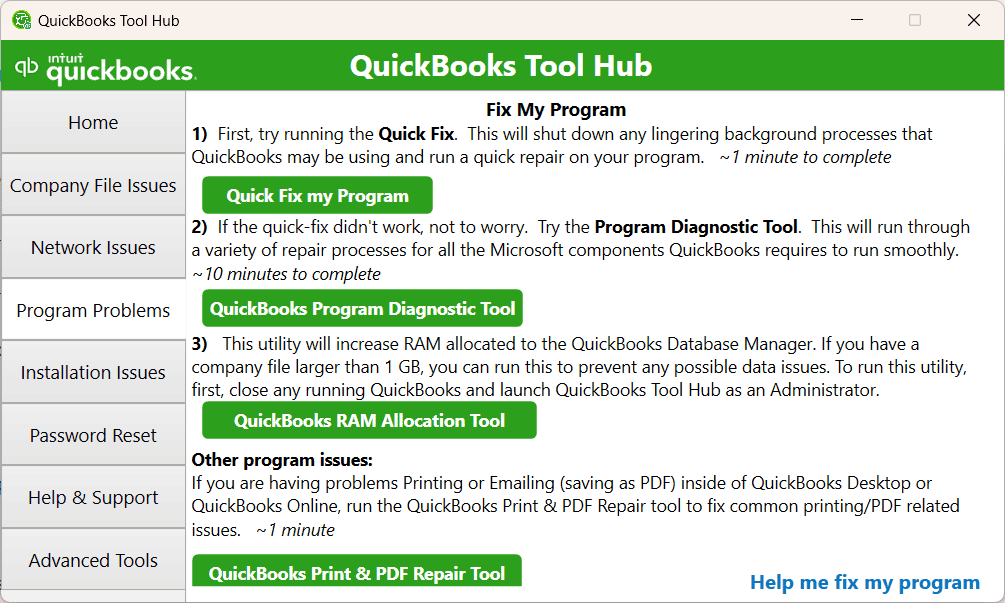
7. Program Problems:- 

Most of the time, users might encounter issues while launching or working in the QuickBooks program. Therefore, to tackle such an issue, you can choose the Program Problems tab and figure out such issues. Not only that, the users can also use this option to deal with PDF and print-related issues. 

Different Tools That Are Included in QuickBooks Tool Hub 

As you know, QB Tool Hub is a combination of different tools. However, every tool works according to the type of issue they face. So, below, we have discussed everything about the tools and what errors you can fix using these tools. 

1. QuickBooks Tool Hub File Doctor Tool:- 

This tool is specifically designed to repair the damage in the company file or the network-related issues in QuickBooks. Moreover, it is the best tool that you can run to fix the H series of errors. You must download the QuickBooks File Doctor tool from the Intuit official web page to get this tool. Later, perform the instructions on the screen to successfully install the QB Tool Hub File Doctor Tool on your device. 

2. PDF Repair Tool QuickBooks:- 

Another tool with the QuickBooks Tool Hub is the PDF Repair tool. Users can use this tool to deal with the issues of outdated printer drivers. Moreover, using this tool, you can fix issues generated while printing transactions or reports. It also deals with issues like QuickBooks can’t save your forms or reports in the . PDF format.

3. QuickBooks Install Diagnostic Tool:- 

The QuickBooks Install Diagnostic Tool fixes all the issues generated while installing the accounting software on your device. Moreover, it also repairs the damage that occurs due to damaged .NETFramework, the MSXML file, and C++.

4. QuickBooks Connection Diagnostic Tool:- 

Intuit mainly designs the QuickBooks Connection Diagnostic Tool to determine the issues related to multiple networks and corruption in the company file. Moreover, this tool also diagnoses and repairs the connection errors between the QuickBooks company files and the database manager. 

5. Clean Install Tool:-

QuickBooks Clean Install Tool is another great tool for removing residual files and folders during the uninstallation and reinstallation of the accounting software. Moreover, this is the best tool to resolve any issue generated while operating the QuickBooks software. 

The clean install tool removes the older installation folder to make enough storage space for the new files. Then, the tool changed the name of the QuickBooks folders and repaired the damage in the company file. 

Drawing To A Conclusion!!

Through this post’s help, we assure you that you can now easily troubleshoot the errors faced while using QuickBooks via QuickBooks Tool Hub. However, if you require any expert supervision, you can get help from our professionals anytime via the live chat facility for immediate resolution. Our experts are available round the clock to assist you in the best possible manner.