Have you ever experienced QuickBooks crashes when sending emailor invoices? If yes, then you are not the only one stuck in this situation. The users might often confront this issue due to the corruption in the hard drive. Other reasons that might give rise to the error are damaged Windows components or issues with Microsoft Office.
Consequently, the occurrence of QuickBooks freezes when trying to email invoice issues might lead to a loss of unsaved information. Therefore, resolving the issue immediately using the troubleshooting methods discussed in the post is essential.
Does your QuickBooks crashes when sending email, and don’t know how to overcome the issue? Call us at Call Us : +1-888-209-3999 and consult with our experts instantly to get all your queries resolved within no time.
What are the scenarios Where QuickBooks freezes when sending Email?
Users may observe QuickBooks freezes when sending email issues in the following instances.
When the users attempt to link their QuickBooks data file with the email.
In other cases, it may happen when users try to utilize the Send Forms function within the QuickBooks application.
You may also observe the error while opening the check register in QuickBooks.
Reasons Why QuickBooks Desktop Crashes When Sending Email
Are you thinking about why QuickBooks Desktop crashes when sending email? If so, go through all the factors listed below that are responsible for the error.
Sometimes, the users might confront QuickBooks crashes when sending email issues when the Microsoft Windows components are damaged.
There might be the possibility that QuickBooks cannot connect with the email server.
In other cases, it may happen when some third-party programs obstruct the connection between QuickBooks and the email server.
Users might confront this error due to the accidental deletion of the QuickBooks company file.
You might face difficulty while accessing the QuickBooks application.
Best Strategies to Rectify QuickBooks Crashes When Sending Email Issues
Does your QuickBooks crashes when sending email, and you don’t know how to fix the problem? In that scenario, you must use the resolution methods listed below to resolve the issue. Ensure you apply the resolution methods in the same manner as described below.
1. Verify the Settings Of Webmail Preferences
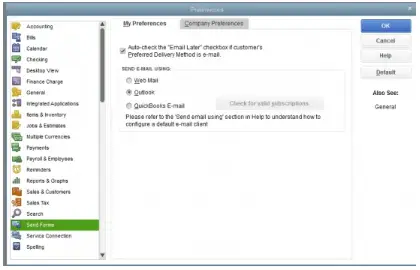
Sometimes, improper webmail settings give rise to QuickBooks crashes when sending emails. Therefore, you must try to change the webmail settings by following the instructions to overcome the issue.
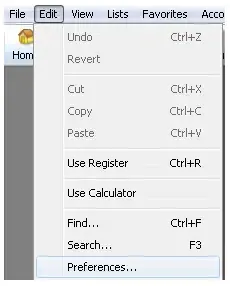
Start the process by opening the QuickBooks application and accessing the Edit menu.
Afterwards, navigate to the Preferences tab and hit the Send Forms option.
Thereon, opt for an email account from the My Preferences section and click the Edit menu.
In the next step, you must confirm that you have selected the SSL checkbox.
Also, you must ensure that the server’s name matches the Server name field.
However, if the outgoing mail is fixed as “SMTP.mail.gmail.com,” you must modify the name to “intuit.SMTP.mail.gmail.com.”
After making the necessary changes, hit the OK button and move to the next step.
End the process by launching the QuickBooks program and then try to send the mail. If you observe that you are still receiving the error, then move on to the next resolution method.
2. Make Use of a Secure Webmail
If you still receive QuickBooks desktop freezes when sending email issue, then you must try using a secure webmail in QuickBooks to resolve the problem. Follow the steps listed below to get the desired outcome.
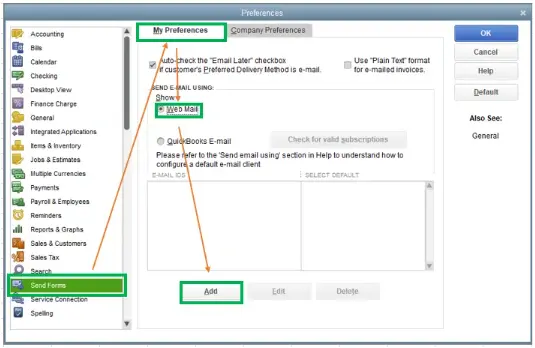
In the beginning, launch the QuickBooks application and then navigate to the Edit menu.
Afterwards, choose the Preferences tab and opt for the Send Forms tab.
Now, you are supposed to pick the Webmail option and click Add.
In the next step, opt for the service provider and include the email address properly.
Thereon, you must ensure that you have kept the “Use Enhanced Security” checkbox unmarked.
Next, hit the OK button, launch QuickBooks, and then add the login credentials accurately.
3. Include Windows Admin User
Go through the following instructions to add a Windows admin user accurately.
You are supposed to include Windows users with specific admin rights, so you must hit the Windows key.
After this, navigate to All Programs and opt for Windows Small Business Server. Then, choose the highlighted Windows SBS Console.
There on, tap the Users and Groups and then click to include a new user Account tab.
In the next step, you must allow a new user admin rights and hit the Finish button to end the process.
Relaunch and then try to sign-in to Windows by establishing a new user. Later on, try to launch the QuickBooks application once again.
4. Try To Install the Latest Update Of Microsoft Outlook
Herein, go through the following instructions to install the most recent updates of Microsoft Outlook.
Launch Microsoft Outlook on your system in the initial stage and pick the Office Account.
Afterwards, navigate to the highlighted Update Options to proceed further.
End the process by hitting the Update Now button.
5. Link an Email Account With the Microsoft Outlook
Primarily, hit the File menu in Microsoft Outlook and then pick the Info tab.
After this, choose Add an Account to start and include the email address you need to add to the respective text field.
Once the Microsoft Outlook has chosen the server, hit the Connect button to proceed.
Thereon, you must add the password accurately and click the OK button to wind up the process.
6. Setting Up Microsoft Outlook as the Default Mail Application
To set up the Outlook as Default Mail, navigate to the Control Panel and move further.
After this, browse to the Programs followed by the Default Programs option.
In the next step, pick the Default Program for the mailing option and proceed further.
Now, you must opt for Microsoft Outlook and hit the Save button to make the selection.
7. Try to Operate QuickBooks in Compatibility Mode
In the first step, launch the QuickBooks application and then navigate to the Properties option.
After this, you must run the QuickBooks program in the Compatability mode.
From the list of options available, select Windows 7 and mark the checkbox of “Run this program as an Administrator.”
Thereon, pick the Apply option and end the process by hitting the OK button.
Conclusion!
Using this illustrative guide, we hope you can now easily overcome the QuickBooks crashes when sending email issues. However, if you still encounter issues while sending emails, connect with our experts anytime to fix your problem. They will guide you with useful tips to deal with the issue immediately without much effort.
QuickBooks has gained immense popularity among the businesses as it offers exceptional features to simplify your accounting tasks. Despite being an extraordinary software, it is still prone to technical errors, including QuickBooks Online delivery serverdown time. This error mainly arises when users try to send emails or invoices through the accounting software. It could happen while using the incorrect email address format in QuickBooks.
Consequently, the QuickBooks Delivery Server error might interrupt the users in sending emails or invoices. Eventually, it might lead to a delay in the ongoing process, which might hamper the workflow. So, stop wasting your time and find the solutions in this blog to rectify the error.
Are you facing issues while fixing the QuickBooks Online Delivery Server Down error? Well, in that case, you must reach out to our professionals by placing a call Call Us : +1-888-209-3999 and get your issue resolved within no time.
What Must You Know About QuickBooks Delivery Error?
At times, the users may confront QuickBooks Delivery error in QuickBooks Online when they attempt to send the invoices or attachments to the customers and fail to do so. Consequently, this error stops the users from sending emails using the software.
However, numerous causes that may lead to the error are explained below. So, stick to this post till the end and fix the issue as soon as possible.
Possible Causes That Might Emerge Delivery Server Down Error In QuickBooks Online
Before you fix the Delivery Server Down Error in QuickBooks, you must know the root causes behind the issue. As a result, it will give you a clear picture of the actual cause of the issue so that you can fix the error easily. Below, we have mentioned all the factors responsible for the error; check them out.
Users often confront this error when your company and customer-facing email address is incomplete or has technical glitches.
Another reason could be using incorrect PDF settings in the browser.
In other cases, it may also arise when your invoice comprises some special characters.
An inadequate internet connection could also be responsible for delivery server down errors in QuickBooks.
Sometimes, it may happen when the format of the email address used in sales form is inaccurate.
Misconfigured Adobe Acrobator Reader settings can also be the reason behind the Delivery Server Down error in QuickBooks Online.
How Can I Deal With QuickBooks Online Delivery Server Down Error?
If you don’t get the proper solutions to deal with the problem on time, then it’s completely useless. So, to deal with the issue right away, we have provided you with some effective solutions below.
Resolution Method 1: Verification of Your Email Address Format
Incorrect formatting of the email address in QuickBooks might lead to the error, so to rectify the issue, you must check the formatting of your email address using the instructions outlined below.
Stage 1: Cross-check your Company And Customer-facing Email Address
The users must confirm that their company email and all customer-facing email address fields are complete and in the correct format. To do the same, you must apply the steps listed below.
Primarily, move to the Settings menu and opt for the Account and Settings option.
Thereon, navigate to the Companytab and then hit the Contact Info tab.
You must verify that the Company Email and Customer-facing email you have entered is correct.
Stage 2: Look Into Your Location’s Email Address
For instance, if you are utilizing the location tracking feature, you must go through the email address format of the location on your sales form.
Initially, navigate to the Settings menu, choose All Lists, and then the Locations tab.
Afterwards, you must pick the appropriate location on the invoice.
Thereon, from the Action column, tap on the drop-down menu and then click the Edit menu.
You must verify your email address in the field that says, “This location has a different email address for communicating with customers” and make the necessary changes if required.
In the next step, choose the Save option and try to resend your sales form.
Resolution Method 2: Review the Format Of Your Invoice
Sometimes, the inappropriate invoice format might be the reason behind the QuickBooks Delivery error. So, to prevent the issue, you must use the steps listed below.
Firstly, the users must open the invoice you failed to send due to the error.
After that, you must check that the invoice doesn’t contain any special characters like (! @ # $ % ^ & * ( ) _ – = + : “) on the information listed below.
Resolution Method 3: Double-check your Sales Email Option
The users must update the attachment setting when mailing the sales forms. For that, you must perform the following steps carefully.
To start the process, navigate to the Settings menu and opt for the Account and Settings option.
Thereon, choose the Sales tab and then go to the next step.
You must move to the Online Delivery section and find whether the checkbox stating PDF Attached is marked. If it’s already marked, then unmark the checkbox and move ahead.
Once you have made all the necessary changes, choose the Save button followed by the Done option.
Ultimately, you must send the sales form again and check whether the issue persists.
Resolution Method 4: Monitor Your Adobe Acrobat or Reader Settings
Using the steps below, you can also resolve the QuickBooks delivery error by testing the Adobe Acrobat or Reader Settings.
Begin the process by accessing the Page Size & Handling section.
Afterwards, pick the Actual Size and choose the paper source by PDF page size.
Thereon, move to the Orientation section and browse the Auto portrait/landscape option.
Resolution Method 5: Do the Proper Configuration Of Your Print And PDF Settings
The users must ensure that the file they are linking isn’t a ZIP file. Also, you must ensure that the file size won’t be more than 25 MB. However, if you see that the name of your QuickBooks data file contains some special characters, then delete it instantly.
Resolution Method 6: Go Through Your Browser’s PDF Settings
The steps to change the browser’s PDF settings may vary according to your browser. Below, we have discussed the steps for Google Chrome and Mozilla Firefox browsers. Use the steps according to the browser you are using.
For the Chrome Users
Start the process by launching Google Chrome on your device and clicking the three vertically placed dots located at the top-right corner.
From the extended list of options, pick the Settings option.
Afterwards, scroll down to the bottom of the screen and tap the Advanced drop-down menu.
Thereon, navigate to the Content Settings option followed by PDF Documents.
You are supposed to disable the Download PDF Files option rather than opening it in Chrome.
Finally, sign in to your QuickBooks data file and send the forms again to check whether the issue is resolved.
For The Users of Mozilla Firefox
In the first place, launch the Firefox browser on your workstation and move to Options.
From the left menu, browse the Applications tab and proceed further.
Go to the Content-Type section and look for the Portable Document Format (PDF).
As a result, you will see the Action drop-down menu, from there, tap the Use Adobe Reader (default) option.
You are supposed to sign in to the company file and try to send or print the forms again.
Conclusion!!
With this post’s help, we hope you can easily resolve the QuickBooks Online delivery server down error. If you are still encountering any issues due to the error while sending the invoices, then get help from our experts at Call Us : +1-888-209-3999. They will assist you with some useful tips to eliminate the issue right away.
Do you want to run the QuickBooks company file in multi-user mode? In that scenario, the users must ensure they have installed the latest QuickBooks Database Server Manager version on their workstation. It is a utility program that enables the users to share the company files with other computers available in the network. Moreover, this tool is perfect for users who wish to work in a multi-user environment.
However, before using the utility, it is a must to get the QuickBooks Database Server Manager latest version installed on your system. Continue reading this post and get all the relevant details to download, install, update, setup, and use the QBDBMgrN on your device.
Are you facing issues while trying to setup QuickBooks Database Server Manager? Well, in that case, you must talk to our professionals by dialing Call Us : +1-888-209-3999and get your issue resolved within no time.
What All You Need to Know About QuickBooks Database Server Manager?
The QuickBooks Database Server Manager is also called a personal database management tool and part of the QuickBooks Desktop application. Moreover, this utility also prepares the .ND files for any company file on the host computer.
Above all of these, the most important thing is that the users won’t be able to access their company files in multi-user mode without getting the Database Server Manager on their device. To gather more details regarding the setup and use of this utility, stick to this post till the end.
How Can You Access the QuickBooks Database Server Manager Features?
Database Server Manager has numerous features. However, to access those features, we have provided the steps below. Check them out.
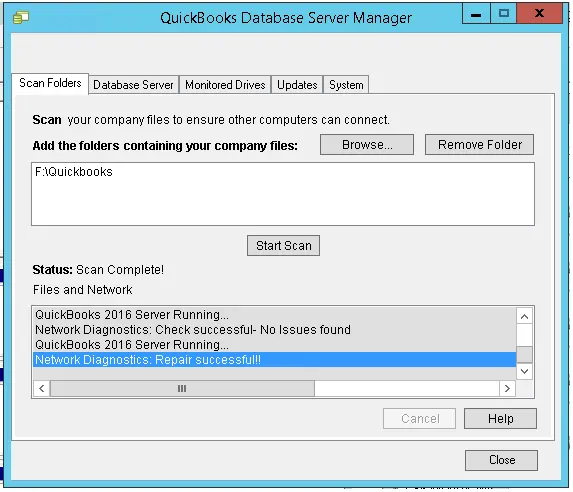
Scan Folder Features-
Scanning the company files in QuickBooks makes it more convenient to work in multi-user mode.
First of all, you must run the QuickBooks application and then access the database server manager.
You should click the Scan Folders button and include the folder by tapping the Add Folder button.
Now, you must scan the entire folder if you face issues finding the relevant one.
Afterwards, the users can easily delete the added folder by selecting the Remove Folder option.
Now, move towards the Scan button and wait until the scanning process is over.
2. Database Server Features:-
You will learn about the following things by accessing the Database Server features.
You will learn about the number of users who have signed in to the QuickBooks company file.
Also, the users can easily connect the data file with the server.
It also presents you with the status of the services associated with the QB Database Server Manager.
Moreover, you will also get the Services Administrative option to make changes in the Services Status and then configure the services such as QBDBXX.
3. System Features:-
This feature will help you grab the information where the tool is located. However, to know more details, have a look at the process below.
Initially, hit the Windows key and select the highlighted Programs option.
After this, pick the QuickBooks option followed by the QB Database Server Manager.
In the next step, you must opt for the System tab and then hit the System Information.
Ultimately, you will obtain all the details regarding the system on which the database server is install.
4. Updates Feature:-
To get more details about the update, hit the Windows key on your keyboard.
After this, navigate to the Programs option and click QuickBooks.
Thereon, hover your cursor over the Updates option.
Finally, review all the instructions attentively, which will assist you to complete the procedure.
Monitor Drive Feature:-
With the help of this feature, you can keep the QuickBooks Database Server Manager tool updated every time you include new QB files on the server.
Also, it helps to examine the local drives you have added, removed, or renamed.
QuickBooks Database Server Manager Requirements to Run Application Smoothly
The QuickBooks Database Server Manager requirements is necessary to run the application seamlessly.
Check that your computer must have a minimum of up to 2.4 GHz processor.
You must require a minimum of 4GB RAM to run the software uninterruptedly. For a better experience, up to 8GB RAM is mandatory for 1-5 users.
Moreover, the additional disk space required is 2.5GB for the company files.
It works well with the US version of the Windows operating system, and the Regional Settings are supported when fixed to English.
How to Install QuickBooks Database Server Manager on Your Workstation?
Go through the following procedure carefully to install QuickBooks Database Server Manager successfully on your device.
Stage 1: Get the Latest Version of QuickBooks Database Server Manager
To get the latest version of the QuickBooks Database Server Manager download, check that you have installed the latest version of QBDT.
Initially, you must download QuickBooks Database Server Manager from Intuit and install it.
Afterwards, pick the Installer option, and it will eventually launch the installation wizard on the screen.
In the meantime, ensure your device is well-connected with a stable internet connection.
Thereon, you must hit the Next button, and if you are not linked to a stable internet connection, press the No button.
You must pick the programs and hit Next to proceed further.
Following this, confirm that you agree to the Terms and Conditions listed in the License Agreement.
Once you are all set, tap the Next button to end the process. Alternatively, you can also use the QB Database Server Manager from the QuickBooks Tool Hub.
Stage 2: Step-by-Step Instructions to Install QuickBooks Database Server Manager
To begin the process, you must confirm that you have closed all the open programs on your server computer.
After this, press the Ctrl + J keys to launch the Download window on your device. Herein, you must look for the downloaded setup file of the QBDBMgrN, represented as “Setup_QuickBooks.exe”.
Thereon, carry on with the steps instructed on the screen to complete the process.
If QuickBooks asks you to pick the installation type, you must go with the Custom or Network Options tab and then hit Next.
Furthermore, you have to pick the best option that suits your network setup and tap the Next button. You can install the QBDBMgrN. But, if you have already installed QuickBooks Desktop on your device, ensure it won’t overwrite any previous company data.
If you require both Database Server Manager and QuickBooks Desktop on your computer, opt for “I’ll be using QuickBooks Desktop on this computer, AND I’ll be storing our company file here so it can be shared over out network.” However, it has been advised to go with this option.
Conversely, if you only wish to get the QuickBooks Database Server Manager on your server computer, pick the “I will NOT be using QuickBooks Desktop on this computer”.
In the end, go through the instructions displayed on the screen. Once you are done, opt for the Install option, and then Windows will prompt you for the permission.
Configuration of QuickBooks Database Server Manager
To set up the QuickBooks Database Server Manager, you must carry on with the procedure explained below.
Launch the Services window by typing Services into the Start’s menu search column.
Once the Services window opens, scroll down to list and pick the QuickBooksDBXX service. Here, the version number is represented by XX.
Soon after this, move to the General section and look for the Service Status. If you notice that the status shows Started or Running, then change it to Stop.
Afterwards, you must pick the Automatic option from the Startup Type menu.
Thereon, navigate to Recovery and opt for Restart the Service from every option i.e., First Failure, Second Failure, and Subsequent Failure.
In the next step, return to the General section and pick the Start option to relaunch the QB Database Server Manager.
Stage 3: Give the Necessary Firewall Permissions
If you don’t have enough firewall and antivirus permissions to run QuickBooks Database Server Manager on your server computer, then assign the required permissions to run it smoothly.
Follow the steps written below to configure the firewall manually.
Include the Firewall Port Exception for QuickBooks
Users with multiple versions of QuickBooks Desktop on the same computer must follow the following steps.
To commence with, press the Windows key, add “Windows Firewall’ into the search panel.
Choose the Advanced Settings option from the upcoming window and then move further.
Thereon, right-click on the Inbound Rules and opt for the New Rule option.
After that, choose the Port > Next > and confirm that you have selected the TCP checkbox.
You have to mention the specific ports required according to your QuickBooks version.
Once you have included the port number accurately, hit the Next button.
Subsequently, go for the Allow the Connection followed by the Next button.
If required, you must ensure you have picked all the profiles and then move further.
You must establish a new rule, assign a new name, say, “QBPorts(year),” and then hit the Finish option.
How to Update QuickBooks Database Server Manager Using These Simple Steps?
The users need to update QuickBooks Database Server Manager to the most recently launched version so that they can access its latest features and functions.
To start the update process, you must access the Download & Updates page using your preferred web browser.
After this, you must look for the latest version available for QB Database Server Manager and click on it.
Thereon, users have to wait until the installation process is over and then reboot the server.
Once you notice that the server is updated on every workstation, you will receive the message indicating: The Company file needs to be updated to work with this “version of QuickBooks Desktop”.
Following this, you will notice that the updates will modify the database structure, and at that time, you will see the “Create a Backup” option.
Consequently, this will enable the users to open the file whenever they follow the on-screen prompts after completing the backup.
Learn How to Use QuickBooks Database Server Manager
Are you wondering how to use QuickBooks Database Server Manager on your device? If yes, then follow the steps listed below in the same manner as given to complete the process successfully.
Phase 1: Get Your Folders Scanned
The users have to scan the folders before they share their files. You can scan the folders only once using the steps below.
Initially, on your server computer, the one that carries your data file, you must launch the Start menu.
After this, add “Database” to the search column and open the QuickBooks Database Server Manager on your device.
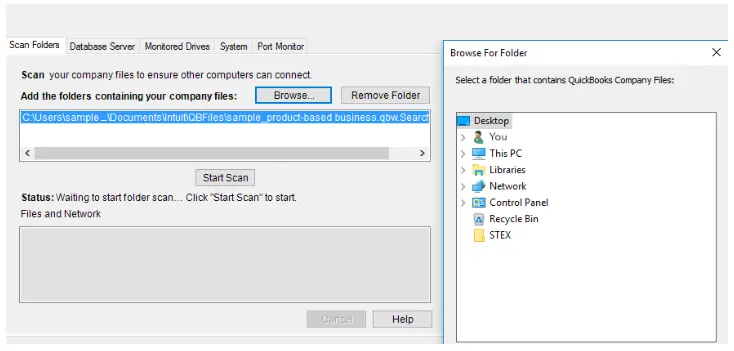
In the next step, navigate to the Scan Folders tab and click the Browse option.
Now, the users need to look for the folder that carries your data file (QBW).
Once you are all set, hit the OK button to proceed further.
Subsequently, you must tap the Start Scan option.
Soon after this, once the scanning process is over, the folder will appear in the QuickBooks company files found section. Thereon, you can use your company file in these folders from other network computers.
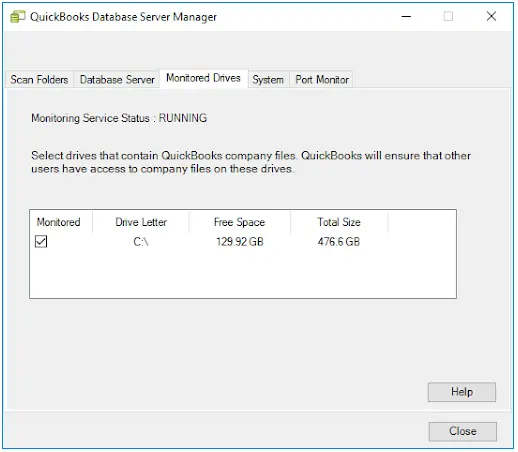
Phase 2: Conduct the Inspection Of Your Drives
Once the scanning process is over, the drive that contains the scan folders will be seen in the Monitored Drives tab. However, to view those folders, the users must select the drive. Furthermore, read the steps below to monitor your drives properly.
In the initial stage, locate and tap the Monitored Drives tab.
After this, mark all those checkboxes for the hard drives holding your data files.
Phase 3: Handle the Database Server Manager
The users will get two different tabs in the Database Server Manager that help to run everything seamlessly.
The first one is the System tab, which describes the location where Database Server Manager is installed on your device.
Another one is the Database Server tab, which provides you with a clear picture related to the exact status of the tool and the connection with it.
What Should You Do When QuickBooks Database Server Manager Stopped Working?
If you are facing a problem when QuickBooks Database Server Manager stopped working or fails to open, you must restart it on your server computer. Here, we have provided the steps for the current setup; check them out.
In case you have installed both QuickBooks Desktop and Database Server Manager
To begin the process, you must launch the QuickBooks Desktop application on your server computer.
Afterwards, navigate to the File menu > Open or Restore Company option.
Thereon, tap the Open a company file and then launch your file.
In the next step, ensure you have marked the “Open file in multi-user mode” checkbox and then pick the Open option.
Ensure that you logged in to your company file accurately using the correct login credentials.
Once again, you must browse to the File menu and opt for the Close Company/Log Offoption. With this, it will shut down your data file on the server.
Furthermore, press the Windows key on your keyboard, and include “Database” in the search panel. Then, you must try to launch the QuickBooks Database Server Manager on your device.
If everything is working perfectly fine, you are good to go. If you still get the same error, follow the resolution method below.
If You Only have QuickBooks Database Server Manager Installed
Primarily, hit the Windows key and then launch the Control Panel on your device.
Thereon, locate and then opt for the Administrative Tools option.
Now, you need to pick the Services from the list of options available.
In the next step, you have to right-click on the QuickBooksDBXX service and choose the Restart option.
Easy Steps to Install the QuickBooks Database Server Manager Linux
Before you begin the installation of QuickBooks Database Server Manager Linux, you first need to check the system requirements to run the program seamlessly.
In the earlier stage, users must download the Linux Database Server Manager RPM package.
Now, you must switch to a root user using the steps below.
The users must open a terminal window on their device.
After that, include the Sudo Password Root and hit the Enter key to move further.
The users need to add their user password accurately.
Thereon, you must review the integrity of the package with the GPG public key. Ensure you have downloaded the Public key on your Linux server and then launch the terminal window. Later on, add the “rpm –import qbdbm-pubkey.asc” and hit the Enter key. If you see that the command represents “gpg ok,” you need to proceed further.
Within the Terminal window, include “rpm -ivh packagename” and hit the Enter key.
You must construct a Directory to save the QuickBooks data file and proceed further.
Lastly, copy the QuickBooks data files to the newly generated directory.
Final Thoughts!!
The users can now easily access their company files in multi-user mode with the QuickBooks Database Server Manager installed on their devices. We hope you find this post helpful in setting up this utility on your workstation. However, if you encounter any issues while using it, contact our professionals anytime at Call Us : +1-888-209-3999 for quick resolution.
Finding one specific file type from many different files is challenging and time-consuming. The same happens with QuickBooks. Numerous file types are available in QuickBooks; finding one specific file from the list of different file types is difficult. But, now, using the QuickBooks File extension makes it easier for the users to determine the file type and saves time, which can be invested further in the company’s growth.
Moreover, understanding the file extension will also avoid compatibility issues and help to share the data smoothly. However, you must read this post attentively to gather more details about the file extensions, their types, and usage.
If you want more clarification regarding the QuickBooks file extension, then connect with our professionals anytime by placing a call at+1-888-209-3999 They will clarify all your queries by offering useful tips.
What is the file extension for QuickBooks?- Briefly Explained
The file extension in QuickBooks is basically an add-on that is applied after the file name, and it indicates the file’s usage. Moreover, the formatting of the QuickBooks Desktop file extension is seen in the form of .xxx. Thus, the file extensions play a significant role for the users in identifying the data file.
What is the Importance of QuickBooks File Extensions?
Different types of QuickBooks file extensions have specific importance and different usage. Go through the pointers listed below to learn about the significance.
With the help of the file extension, it becomes easy to identify the file type, which will eventually help the desktop to open the file in the right application.
Also, it helps you organize the same kind of QB file extension for a smooth accounting flow and prevents the data from merging.
Once you look at the file extension, it becomes more convenient for the users to determine the file type and helps save time searching for one particular file.
Moreover, it also helps verify the data file’s authenticity to secure it from unauthorized access.
Describing QuickBooks File Extension Types and Its Usage
The QuickBooks Desktop application utilizes different types of files to save data. Herein, we have listed all the QuickBooks file extension types and their usage. Check them out to get in-depth knowledge regarding the same.
File Extension Used in Common QuickBooks Files
Herein, we have discussed about the file extensions that is used for the common QuickBooks Files.
1.Company File (QBW):-
Every time the user generates a data file, QuickBooks will eventually build a file with a .qbw file extension. You will get all the data related to the company file and account in this file.
Whenever the user tries to email or transfer a data file, you will see that QuickBooks will generate a compressed version of your data file with the .qbm extension.
3.Backup File (QBB):-
The users can schedule the backup of the company file to recover their lost or damaged data. QuickBooks saves such files with the .qbb file extension.
Once you have downloaded the transactions from your bank, QuickBooks will open that file with the .qbo extension. Also, you can easily import the file to get the transactions into your bank account.
Extension Used For QuickBooks Statement Writer Files
Below, we have elaborated all the extensions that you can use for the QuickBooks Statement Writer files.
1. QSM:-
The QuickBooks Statement Writer will automatically transfer the information to a file with a .qsm extension. Moreover, you can also utilize the QSW files in Microsoft Excel.
2. QST:-
For instance, if the users require a specific layout, they can use the template file that is already available with the .qst extension.
3. QSS:-
Whenever the users customize their statements and reports using QuickBooks Statement Writer, the settings will save in the file having .qss extension. You can also use this file to apply the settings to the different reports.
File Extension Use For the Utility and Log Files
Go through all the pointers listed below properly to learn more about the file extensions use for the Utility and Log files.
1. IIF (Intuit Interchange Format File):
QuickBooks will generate a file with a .iif extension whenever the list information is exported. The users can also use these files to share your lists with other data files.
2.ECML (Entitlement file):-
The QuickBooks application will generate a file with .ecml extension whenever you try to install and register the accounting software. Moreover, this file will also notify you that you are accessing the licensed product.
3.Log (Event Log File):-
QuickBooks usually lists all the important events in a file with a .log extension. Two different types of log files are available, which are as follows;
Qbwin.log:- It lists all the issues found during the rebuild.
QWC.log:- Herein, you can note all the Web Connect errors.
4. QBP (QuickBooks Print File):-
To fix your printing preferences, QuickBooks will save it into a file having .qbp extension. Apart from this, the users must also make some modifications when encountering printer-related issues.
5.TLG (Transaction Log File):
QuickBooks will monitor the changes made since the last backup. Then, it saves that particular file with the .tlg extension, and the next time you try to back up the file, QuickBooks will automatically reset it.
QuickBooks Accountant Copy File Extension
Following are the file extensions for the QuickBooks Accountant Copy; check them out.
1.QBX (Accountant’s Review Copy/ Transfer File):-
QuickBooks constructs a file with the .qbx extension whenever the user tries to generate the backup of the data file for the accountant. Then, you can export and send this file to your accountant, and when that backup file is kept with the accountant, it will eventually turn into an accountant’s backup copy file.
2. QBY (Accountant’s Copy Import File):-
Once the accountant goes through the accountant’s copy and makes the necessary changes, the accountant’s copy is generated. This file will be represented as a .qby file extension.
3. QBJ (General Journal Entries File):-
To add the journal entries generated by the accountant, you must prompt them to send you the General Journal Entries file with the .qbj extension.
4.QBA (Accountant’s Copy File):-
Whenever the accountants access the .qba file, the client will send it for review, which will become an accountant copy. You will see the file with the .qba file extension.
File Extensions That You Use For Additional QuickBooks Files
Following are the file extensions that you can use for the additional QuickBooks files.
1.DES (Layout Designer Templated File):-
When you export the customized form template, the file is generated with the .des file extension. The users need to export the custom templates to utilize it in other data files or share them.
2. Qbstbl2.usa (US Tax Table File):-
The users require the US Tax Table file to obtain the information regarding the latest tax table updates. Moreover, it also comprises of all the updated payroll details that you require to compute your payroll taxes.
This file is generated whenever you export a memorized report template in QuickBooks.
4.QWC (QuickBooks Web Connecter File):-
The QuickBooks Web Connector connects the QuickBooks application with other third-party applications. After this, the file with the .qwc extension will automatically form.
Different Types of QuickBooks File Extensions for Mac Devices
The QuickBooks file extensions for Mac devices may vary. So, we have described the QuickBooks Mac file extension in detail below.
1.MAC.QBB (Backup File):-
Users can use this file to transfer the QuickBooks Mac file to QuickBooks Desktop for Windows devices.
2.Plist (Apple Property List Files):-
The Plist file mainly comprises the information regarding your registration and preferences.
3. DMG (Apple Disk Image File)-
You can use this file as your backup QuickBooks data files, and the QuickBooks saves the file in as the Apple Disk Image.
4.QB2016 (Company File):-
It shows that your company file is for the 2016 version of QuickBooks for Mac devices.
5. QB2019 (Company File):-
This reflects that your data file belongs to the 2019 version of QuickBooks for Mac devices.
Concluding the Post!!
With the help of this post, we hope that you understand the relevance of the QuickBooks file extension and its usage. However, if you are looking for any additional information, we suggest you consult with our professionals anytime at+1-888-209-3999 or via the live chat facility. The experts will provide useful tips to figure out the issue instantly.
IRS Form 941 is an employer’s quarterly tax return to be filed by employers or business owners who pay wages to an employee. The employers must file QuickBooks form 941 to report the federal income tax withheld, Medicare tax, and social security number from each employee’s salary. Moreover, the main motive for creating the form is to compute the employer’s social security and other additional taxes withheld. Continue reading this post, to learn how to file Form 941 with the IRS and reduce the burden of filing taxes manually.
Do you want to gather more details about the QuickBooks Form 941 and need instant help? Call Us : +1-888-209-3999and consult with our professionals to get all answers to your queries quickly.
How Does QuickBooks Populate Form 941?- Briefly Explained
In this blog section, we have explained how QuickBooks populates Form 941. The employers must file form 941 by the last day of the month following the quarter’s end.
For the Quarter
Form 941 is Due
1st Jan to Mar 31
Apr 30
Apr 1st to 30 June
July 31
1st July to Sept 30
Oct 31
Oct 1st to Dec 31
Jan 31
Note:- If the due date to file the 941 Form falls on Saturday, Sunday, or a legal holiday, you may file the return on the next working day.
Herein, we have explained all the details required on Page 1.
Company Details:-
Review the following steps to verify/update your employer’s name and address in QuickBooks.
For the QuickBooks Online Payroll
To commence with, move to the Settings icon and tap on the Payroll Settings.
After this, choose the Edit menu beside the General Tax option.
You must update your Filing Name and Address in the respective text field.
Finally, hit the Save button and click Done to speed up the process.
For the QuickBooks Desktop Payroll
Start the process by accessing the Company option followed by My Company.
Afterwards, click the Edit icon and browse to the Contact Information and Legal Information tabs to make the relevant changes.
Once you have made the changes, hit the OK button. Note:- You have to establish a new form if you have changed your company file address.
Line 1:- Number Of Employees:-
Herein, you have to list the employees having a pay period from the date of Mar 12 (for Q1), June 12 (Q2), Sept 12 )for Q3), or Dec 12 (For Q4).
Line 2: Wages, Tips, and Other Compensation:-
The QuickBooks application will automatically compute the total wages, tips, bonuses, and other pay linked to federal income tax and paid to employees throughout the reporting year. However, it won’t add the wages earned in the reporting year and paid in the following year.
Line 3: Income Tax Withheld:-
Herein, the QuickBooks will add the total amount of the Federal Withholding given on the paychecks for the quarter.
QuickBooks Online Payroll
To compute the income tax, move to Reports and look for the Payroll Detail report.
After this, pick any quarter beside the Date Range section and hit the Apply button.
You must go through the FIT Amount and tally the numbers.
QuickBooks Desktop Payroll
The users have to run a Payroll Summary report for the quarter. Then, verify that the total amount of Federal Withholding must be equal to line 3.
However, if you have Basic, Standard, or Enhanced Payroll, you must include a liability adjustment for that employee. After this, the adjustment amount will be given to the employee.
Line 4: Wages Not Subject:-
This box is not available for QuickBooks users.
Line 5a: Taxable Social Security Wages:-
According to the American Rescue Plan Act, any leave that is taken after Mar 31, 2021, will be seen in Line 5a.
QuickBooks Online Payroll
To commence with, choose the Reports option and click Payroll Details report.
You have to pick a quarter and then hit the Apply button.
Beneath the Total column, see the Wage Totals and then deduct the tips total. Then, ensure that the result must tally’s with column 1 in Line 5a.
After this, opt for the Last Calendar Quarter and then hit the Total Only. Later on, ensure you have unmarked the Hours and Rates checkboxes.
Thereon, click the Filters tab and then pick the Selected Payroll Items in the Payroll Item drop-down list.
Now, choose Federal Withholding, Medicare Company, Medicare Employee, Social Security Company, and Social Security Employee. Then, clear if any item has already been chosen and hit the OK button.
Afterwards, to return to the Payroll Summary Report, hit the OK button.
In the next step, double-tap on the “Social Security Employee Total” amount to see the Transactions By Payroll Item report.
Line 5a(i) Qualified Sick Leave Wages:-
You have to use this column only if you paid an employee for the Qualified Sick or Family Leave, taken after Mar 31, 2020, and before Apr 1, 2021. Moreover, the employee payment is made in the current quarter.
Line 5b- Taxable Social Security Tips:-
In Column 1 of QuickBooks, you must add wage-based tips for Social Security. On the other hand, in Column 2, you have to add the calculated amount.
Line 5c- Taxable Medicare Wages & Tips:-
In Column 1, you must include the wage base amount for Medicare; in Column 2, add the calculated amount.
Line 5d- Taxable Wages & Tips Subject to Additional Medicare Tax Withholding:-
The QuickBooks includes the Medicare Employee Addle Tax wage base in the column 1 section. On the other side, Column 2 it shows the calculated amount, but it won’t tally the amount of tax withheld as calculated by QuickBooks.
Line 5e- Total Social Security & Medicare taxes
Herein, you will get the total amount of lines 5a, 5b, 5c, and 5d.
Line 5f- Section 3121(q) Notice and Demand – Tax due on unreported tips
QuickBooks application won’t supply this number to the users.
Line 6- Total Taxes Before Adjustments
You can calculate this amount by adding the amount in lines 3, 5e, and 5f.
Line 7- Current Quarter’s Adjustment For Fractions of Cents
In this section, QuickBooks computes the fraction of cents and the difference between the net taxes amount and the quarter’s liability amount.
Line 8- Current Quarter’s Adjustment For Sick Pay
This amount isn’t available in QuickBooks.
Line 9- Current Quarter’s Adjustment For Tips and Group-Term Life Insurance
This column in QuickBooks also doesn’t provide the number.
Line 10- Total Taxes After Adjustments:-
The total amount is computed by summing up lines 6, 7, 8 and 9.
Line 11a- Qualified small business payroll tax credit for increasing research activities:-
QuickBooks won’t provide this number because the new reporting process for this credit mainly needs the business financial data.
Line 11b- Nonrefundable portion of credit for qualified sick and family leave wages for leave taken before Apr 1, 2021.
Herein, “Nonrefundable” implies that the employer’s share of the applicable taxes is minimized on Form 941 before any refunds are computed. Moreover, the non-refundable amount you insert in this column will be less than or equal to the employer’s share of the Social Security tax.
Line 11c- Reserved For Future Use:-
This line is mainly generated for future use.
B. Lines seen on Page 2
In this section, you will get all the details that you have to mention on Page 2.
Line 11d- Nonrefundable portion of the credit for qualified sick and family leave wage taken after Mar 31, 2021
In this section, the term “non-refundable” denotes the employer’s share of Medicare tax, which is reduced on form 941 before computing any refunds. Also, if any credit is available, more than the employer’s share of Medicare tax will be refundable and recorded on line 13e.
Line 11g- Total Refundable Credits. Add Lines 11a, 11b, and 11d.
In this section, the non-refundable term denotes that the employer’s share of the applicable taxes has been minimized on Form 941 before calculating the refunds. Moreover, if there are any credits over the employer’s share of applicable taxes, they will be refunded. Thereon, that particular amount will appear on the lines with the title “refundable.”
Line 12- Total Taxes after adjustments and credits
The QuickBooks computes this amount by subtracting line g from line 10.
Line 13a- Total deposits for this quarter
In this column, QuickBooks will compute all the deposits of Federal Withholding, Medicare Employee, Social Security Employee, Medicare Company, and Social Security Company, along with a paid-through date within the quarter.
Line 13c- Refundable portion of credit for qualified sick and family leave wages for leave taken before Apr 1, 2021.
This section shows the amounts you get after the employer’s share of social security tax for the quarter, which is minimized to zero by any non-refundable credits.
Line 13e- Refundable portion of the credit for qualified sick and family leave wages for leave taken after Mar 31, 2021, and before Oct 1, 2021.
Herein, the amount mentioned in this section represents the amount you get after deducting the employer’s share of Medicare tax for this quarter and minimized to zero by non-refundable credits.
Line 13g- Total Deposits and Refundable Credits
This amount is basically computed by adding lines 13a, 13bc, and 13 e.
Line 14 – Balance Due
This amount is computed by QuickBooks by subtracting line 13g from line 12. However, if you notice that line 12 is more than 13 g, your balance will be due and displayed on line 14.
Line 15- Overpayment
Herein, QuickBooks deducts the amount in line 12 from line 13g. However, if the amount in line 13 g exceeds line 12, it will denote overpayment. Thus, the amount of the overpayment is seen in line 15.
Line 16- Tax Liability for the quarter
In this section, QuickBooks will sum up the total taxes accrued daily on paychecks for Federal Withholding, Medicare Employees, Social Security Employees, Medicare Companies, and Social Security Companies.
Note:- Line 11e, 11f, 13b, 13d, 13f, 13h, and 13i is reserved for future use by QuickBooks.
The QuickBooks application lets users file and pay their federal taxes electronically. Go through the instructions below to e-file form 941 QuickBooks and file the taxes smoothly.
Stage 1. Setting Up For E-Filing 941 Form
Before e-filing the QuickBooks Payroll Form 941, you must set them up by applying the instructions below is necessary.
First of all, choose the Employees tab and opt for the Payroll Center from the list of options available.
After that, hit the Payrolltab from the top and pick the File Forms option.
In the next step, tap the Change Filing Method from the bottom below the Other Activities section.
Thereon, pick the Federal Form 941 from the list of options available and then hit the Edit button.
Finally, choose the E-File option and hit the Finish button to end the process.
Stage 2. E-Filing Of The 941 Form
Herein, we have described the procedure to e-file the 941 tax form QuickBooks.
Initiate the process by choosing the Employee menu.
After this, tap the Payroll Tax Forms & W-2s and click the Process Payroll Forms option.
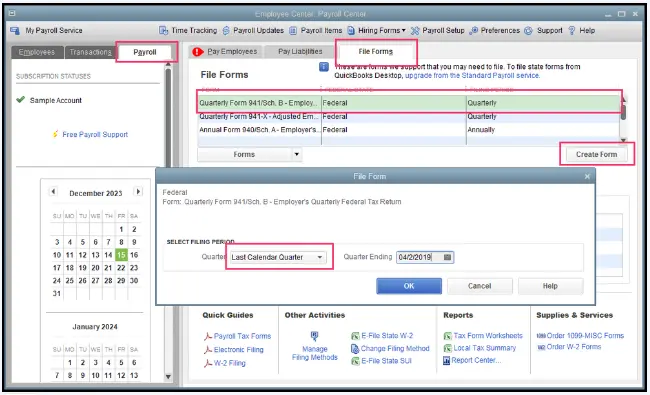
Now, hit the Payroll tab and opt for the File Forms to proceed further.
Thereon, navigate to the 941 Form from the list of options available and then select the Create Form option.
You must choose the filing period and hit the OK button.
In the next step, you must go through the entire form and then fix if there are any issues.
Once done, hit the Submit Form button and then the E-File option.
Furthermore, go through the instructions given on the screen to e-file form 941 successfully.
How to Get Form 941 in QuickBooks Online Using These Simple Steps?
Go through the procedure given below to get the QuickBooks Online form 941.
Initially, navigate to the Reports menu and look for the Tax and Wage Summary Report.
After this, choose the Quarter beside the Date Range column and then hit the Apply button.
Thereon, you must search for the totals beneath the Federal Taxes (941/944) (Federal Withholding, Medicare Employee, Medicare Company, Social Security Employee Taxes, and Social Security Company).
How to print form 941 from QuickBooks Online With These Simple Steps?
Herein, we have described the step-by-step instructions to print form 941 from QuickBooks Online.
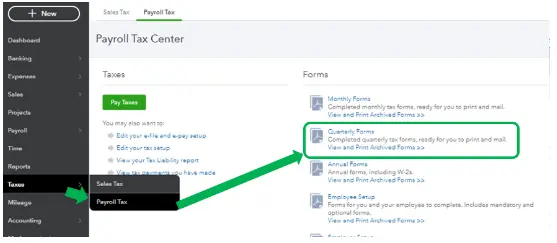
Initially, move to the Taxes option from the left navigation menu and opt for the Payroll Tax option.
Afterwards, below the Forms section, pick Quarterly Forms or View and Print Archived Forms tab to see the forms archived from the previous periods.
Thereon, you must hit the highlighted 941 Links option.
Next, tap the Preview option, and then you can download Form 941 in PDF format or print it.
To Summarize The Above!!
We hope that you now understand everything about QuickBooks Form 941. However, if you want to get any additional information about the form, then have a one-to-one consultation with our professionals at Call Us : +1-888-209-3999 to get immediate help. They will provide the best assistance to figure out the issue instantly.
The businesses must file the W-2 and W-3 forms with the Social Security Administration at the end of each calendar year. The Form W-2 is a wage and Tax statement sent to every employee by the employer and the IRS at the end of the year. Form W-3 is the tax form employers mainly use to file employee income to the IRS and Social Security Administration. However, employers can also print W-2 and W-3 Forms in QuickBooks and send their copies to the employees.
To gather more details about the filing and printing of these forms, read this post thoroughly. Thus, it will help you file state and federal taxes with the IRS smoothly without any issues.
Didn’t have any proper guidance to print W-2 and W-3 forms in QuickBooks and need quick assistance? Ring us at +1-888-209-3999and have a conversation with our professionals to receive the best guidance within the shortest time applicable.
Print Your W-2 and W-3 Forms in QuickBooks Applying These Simple Steps
Printing your W-2 form in QuickBooks is important when you have to send copies to your employees to maintain your records. Conversely, a W-3 form in QuickBooks is required to send to the accountants. Furthermore, review the procedure below to print your W-2 and W-3 forms in QuickBooks.
Stage 1: Purchase the W-2 Paper (If Possible)-
For instance, if your employee has lost or doesn’t have the original W-2 form or requires a copy, you can print it on plain paper and move to the next step. Conversely, if you print from QuickBooks and want to mail official copies to the employees, you must get the W-2 paper. For this, you must perform the instructions outlined below.
Reach the QuickBooks Checks & Supplies page using your preferred web browser.
After this, navigate to the Tax Products option and hit Blank W-2 kits.
Furthermore, act according to the instructions on the screen to wind up the order.
For the users of QuickBooks Online Payroll or QuickBooks Desktop Payroll Enhanced or Standard, you must need at least 3-4 parts of perforated paper.
Meanwhile, you require four parts of perforated paper for the QuickBooks Desktop Payroll Assistant.
Stage 2: Commence With the Printing of W-2s and W-3 Forms
To begin the process, you must pick the product according to your preference to print your W-2s and W-3 forms.
Print W-2 and W-3 forms in QuickBooks Online Payroll.
The users can easily print their W-2 forms in QuickBooks on or after the dates below.
In case your automated taxes and forms settings are disabled, then you can print on or after Jan 1.
If your automated taxes and forms settings are enabled, you can print on or after Jan 15.
Steps to Print Current Year or 1 Year Earlier
Begin the process by choosing the Taxes option followed by Payroll Tax.
After that, browse to the Filings option > Resources > W-2s.
You must thoroughly read the list of employees selected for the printed copy.
The users must know that the W-2 form isn’t printed for the employees, which goes with the paperless option. In that case, they can print the form via QuickBooks Workforce if it is mandatory.
If your automated taxes and forms settings are disabled, you must go through your Form W-2 print setting option. After this, opt for the Change Setting option to change the paper type if required.
Thereon, hit the View or Manage option on the copy that you require
W-3 Summary Transmittal of Wage and Tax Statements.
W-2, Copies A & D (employer)
W-2, Copies B, C & 2 (employer)
Afterwards, choose the highlighted View and Print options and then pick the Print icon from the Adobe Reader toolbar, followed by the Print option.
Note:- For instance, if you are printing the W-2 or W-3 form again if your employee has lost the form, you must include REISSUED STATEMENT on the top. Moreover, you also have to add a copy of the W-2 instructions along with it.
Steps for Printing the Forms For Prior Years
Choose the Taxes > Payroll Tax > Filings > Resources > Archived forms and filings option to print the prior years’ forms.
After this, you must pick the date range according to your preference. Otherwise, you can also search for the forms you require directly.
Thereon hit the View on the W-2 or W-3 form you wish to print and then move further.
To accomplish the process, tap the Print icon from the Reader toolbar and click the Print option again.
Print W-2 and W-3 forms in QuickBooks Desktop Payroll Assisted
The employers can print their W-2 forms in QuickBooks Desktop Payroll Assisted at the start of Jan 10. However, if you opt for Intuit Print, you are only required to print the W-2 form when the employee has lost or didn’t obtain the original copy.
To start, choose the Employees menu and click Payroll Center > File Forms tab > View/Print Forms & W-2s.
You must include the Payroll PIN accurately in the search column and hit the OK button.
Now, tap the W-2s tab,pick the year, and then choose all or individual employees according to your requirements.
Afterwards, choose the Open/Save Selected button and choose the valid reason for printing the W-2s form.
Finally, click on the File menu on the Adobe Reader and hit the Print option.
Print W-2 and W-3 forms in QuickBooks Desktop Payroll Enhanced and Standard.
The users can print their W-2s form on or after Jan 1. Use the steps below to print the QuickBooks Desktop Payroll Enhanced and Standard Edition forms.
Before proceeding further, confirm that you have updated QuickBooks and the QB payroll tax table to the recently launched version.
Afterwards, go to the Employee drop-down menu and pick the Payroll Tax Forms & W-2s > Process Payroll Forms.
In the next step, browse to the File Forms tab and choose the Annual Form W-2/W-3 – Wage and Tax Statement/Transmittal.
You must navigate to the Create Form option and pick all or individual employees to file.
The users have to mention the year appropriately and hit the OK button.
Following this, click All or Individual Employees to print and go with the Review/Edit option to go through every W-2 form. Every W-2 form that is reviewed shows the checkmark in the Reviewed column.
Once everything is okay, opt for the Submit Form button and go through the steps to print and file the forms.
Here’s How to file your W-2 and W-3 forms in QuickBooks Desktop
Before filing your W-2 and W-3 forms in QuickBooks Desktop Payroll Enhanced, ensure you have the following.
The users must have an active and valid QuickBooks Desktop Payroll Enhanced Account.
Moreover, you must also have the correct Federal Employer Identification Number (EIN).
You require a W-2 paper to print the form. Alternatively, you may also use blank 3-part or 4-part perforated paper.
Apart from this, it also requires your valid phone number and email address associated with QuickBooks.
Procedure to file the W-2 and W-3 Forms
To begin the process, you must set up your tax filing method. For this, choose the PayrollTax Forms and W-2s followed by the Process Payroll Forms option.
After this, navigate to the Other Activities list and pick the Manage Filing Methods.
Thereon, go with the Filing Methods, opt for Federal Form W-2/W-3, and hit the Edit button.
You must pick the appropriate filing method, e-file, or print and mail option. Then, hit the Finish button to end the process.
Note: The users don’t have to enroll with the Social Security Administration to e-file the W-2 and W-3 forms.
To file the W-2 form, browse the Employees menu and opt for the Payroll Tax Forms and W-2s.
After this, choose the Process Payroll Forms option and hit the Annual Form W-2/W-3 Wage and Tax Statement Transmittal, followed by the Create Form option.
Thereon, you must pick whether you wish to file the taxes for all or only one specific employee.
From the Select Employees for W-2/W-3 window, select to review and edit every employee form thoroughly.
Consequently, you will see a window displaying the list of employees with W-2 forms that were reviewed and printed.
Following this, hit the Next button to review every part of the W-2 and the W-3 form.
You must click the Check For Errors tab, redirecting you to the form section needing repair. Herein, you are supposed to resolve all the issues before e-filing.
Furthermore, go with the Submit to Print or E-file the form option.
Later on, for printing and mailing the form., choose the Print option. The users can also print the form in PDF format by choosing the Print PDF option.
To file the W-2 form electronically, pick any of the products listed below.
QuickBooks Online Payroll Users
The users must perform the following steps to e-file the W-2 form electronically.
Stage 1: E-Filing Of Your W-2s Form
To start the process, you must log in to your QuickBooks Online account.
After this, choose the Taxes option > Payroll Tax > Filings option.
Thereon, from the W-2 copies A & D (Employer) section, opt for the File menu.
You must tap the Annual Forms option followed by W-2 Copies A & D (Employer) and the Continue option.
Now, if asked, you must tell whether one or more employees are active participants in a retirement plan throughout the tax year.
From the Employer Copies: Form W2 page, hit the View button to launch the Acrobat Reader.
The users must review and print Copy D (Employer’s Copy) for your records.
Furthermore, tap the Submit to Authorize Us for filing copy A of Form W-2 electronically.
After processing the W-2 form, you will get an email telling you the filing is done successfully. However, the users can verify the filing status from the Status page using the following steps.
Initially, go to the Taxes menu and hit the Payroll Tax button.
Afterwards, choose the Payroll Forms or Filings option and tap the W-2 form.
Stage 2: Get Your W-2s Forms Printed and Send them to Your Employees
Users must print their W-2 forms using the above procedure and then send them to their employees.
Filing Of Your State W-2 Forms
Users accessing the QuickBooks Online Payroll Core, Premium, or Elite automatically file their state W-2 forms with the Federal W-2. On the other side, follow the steps below while filing the state W-2 form in the QuickBooks Desktop Payroll Enhanced edition.
First Step- Generate Your W-2 Form To Send To your State
Go through the following instructions to prepare the file you will send to the state.
Firstly, move to the Employees menu > Payroll Tax Forms & W-2s > Create State W-2 E-File option.
After this, you must hit the Continue button twice and choose the state where you live, followed by the Get QuickBooks Data option.
Thereon, tap the OK button to resolve errors or include missing details.
Subsequently, click the Add-Ins tab to search for the QuickBooks Payroll State W-2 drop-down menu. Later on, opt for the Start Interview option.
Confirm that the checkbox “I understand that I must review my data and answer the following questions” and hit the Next button.
The users must write down the file name and location and move further.
Following this, you must provide all the answers to the questions in the interview and thoroughly review any auto-populated info.
Furthermore, tap the Next button until you reach the End of Interview section.
Later, opt for the Create W-2 File > OK and click Yes to save the Excel workbook for your records.
Second Step:- Visit Your State Agency Website
To visit the State AgencyWebsite, launch your preferred web browser and access the state agency website. However, check out the Payroll Tax Compliance Links if you need assistance getting your state agency website.
Third Step:- Uploading Of Your State W-2 Form
Once you review the state agency website, go through the following steps to upload your file.
To upload the form in Georgia, North Carolina, North Dakota, Utah, Virginia Or Wisconsin
First of all, open the QuickBooks application and then navigate to the Employees menu > Payroll Tax Forms & W-2s > Process Payroll Forms.
After that, move to the File Forms section and pick your state worksheet.
You must go through the Select Filing Period year and change if you wish to do so.
Thereon, hit the OK button and complete the W-2 worksheet.
Later on, tap on the Check For Errors option to ensure everything is correct before you file the form.
Once you are all set, click on the E-file and add your email address and phone number.
Conclude the entire process by hitting the Submit button.
For the users staying in California, Lowa, or New York
The users won’t have to file a separate state W-2 form as it is already added to the Federal W-2 file.
For the users staying in Alaska, Florida, New Hampshire, Texas, Washington, or Wyoming
The people don’t have to file any state W-2s form, as the state doesn’t include any withholding taxes.
When is the Best time to File the Form W-3 in QuickBooks?
The best time for filing the W-3 form entirely depends on how you have filed the W-2s Form with the Social Security Administration (SSA).
In case you have already mailed the W-2 copy A to the SSA, the users have to file the Form W-3 with a copy of the W-2 form. Thereon, the users must fill out the “Get a report that shows my W-3 info” form to obtain the complete details of Form W-3.
Conversely, if QuickBooks already filed your W-2 form, you won’t have to file the W-3 form.
Conclusion
Through this guide’s help, the users can now easily print W-2 and W-3 forms in QuickBooks without encountering any issues. However, if you find any difficulty doing the same, you can get help from our professionals at +1-888-209-3999 and resolve your issue.
Payroll processing is one of the most important business activities that requires a lot of time and effort to run smoothly. However, while processing the payroll, the employers incur expenses like taxes, benefits, and wages paid in advance. Until the company pays this expenditure, it is called payroll liabilities. Therefore, to manage the payment properly, users needs to pay payroll liabilities in QuickBooks and run the business operation smoothly.
Encountering issues while paying payroll liabilities in QuickBooks without any expert’s supervision? Contact us at +1-888-209-3999and have a conversation with our highly-certified professionals and let them handle it on their own
What Do You Understand By Payroll Liabilities in QuickBooks?
In general, payroll liability is the amount that is spent by the employer while hiring the worker to accomplish their task. However, businesses must pay their payroll liabilities on time. Otherwise, it might need fixing while reconciling the accounts. Therefore, the users can also track the payroll liabilities in QuickBooks and pay them to simplify payroll processing.
Pay Payroll Liabilities in QuickBooks Online Using These Simple Steps
Do you need help finding the exact procedure to pay payroll liabilities in QuickBooks Online? Fret Not!! You only need to use the steps below to get the desired outcome.
To start the process, the users first have to logged in to their QuickBooks Online account.
Once you enter the QBO account, navigate to the Payroll Tax Centre beneath the Taxes section.
Now, in the Taxes section, you will get two tabs, one for the Sales Tax and another for the Payroll Tax. You have to hit the Payroll Tax tab to proceed further.
Thereon, choose the Pay Taxes or View All link on the screen.
You must look for the taxes you wish to pay and tap on the Record Payment option.
Once you pay all the taxes, you will notice that the balance amount will gradually decrease.
However, you can check the Payroll Tax Payments report to see all the payroll taxes. You must move to the Reports page and look for the Payroll Tax Payment.
Easy Process to Adjust Payroll Liabilities in QuickBooks Desktop Payroll
Go through the following process to adjust payroll liabilities in QuickBooks Desktop Payroll.
Stage 1: Look For the Payroll Discrepancies
The users first have to conduct the payroll check-up using the steps below.
To start the process, try to schedule the backup of the company file.
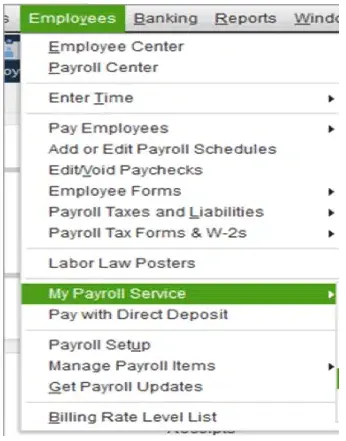
After this, browse to Employees, click My Payroll Services > Run Payroll Checkup.
Thereon, go for the Data Review option, and if you spot any errors, fix them.
From the Review your payroll data screen, hit the No button to enable payroll Checkup to establish the wage base discrepancy adjustments.
At last, tap the Continue button followed by Finish.
On the other side, if you wish to run the payroll checkup for the last year, make the
Stage 2: Do the Necessary Adjustment in Liabilities
In the first place, move to the QuickBooks Employees menu and opt for the Payroll Tax and Liabilities option.
After this, choose the Adjust Payroll Liabilities option and then proceed further.
Thereon, you must pick the last paycheck date of the affected month and quarter from the Date and Effective Date column.
You must opt for the Employee Adjustment to rectify the employee’s YTD information. Later on, pick the employee’s name.
Below the Item Name section, you must go with the payroll item you wish to adjust.
Subsequently, you must mention the adjustment amount in the required text field.
For instance, if your item is under-withheld, you must include the positive amount to increase.
When the item is below-withheld, mention a negative amount to decrease.
The users must include the amount in the Income Subject to Tax column for the wage base adjustment.
Afterwards, mention the note regarding the adjustment for the reference beneath the Memo section.
Following this, pick the Accounts Affected option followed by OK.
Go with the “Do not affect accounts” to leave the balances unchanged for the liability and expense account. You will see that the adjustment will only edit the year-to-date amounts on your payroll reports.
The users must pick the “Affect liability and expense accounts” to show the transaction in the liability and expense accounts.
In the next step, hit the OK button to shut down the Affects Accounts window.
Finally, choose the Next Adjustment if you have any extra employees for which you must include the adjustment. Alternatively, go with the OK option to save the mandatory changes made.
Stage 3. Verify Whether the Liabilities are Updated
Follow the steps below to verify whether the payroll liabilities are updated in the QuickBooks Desktop payroll.
The users must run the payroll summary report again to confirm everything is working perfectly. For this, you must use the steps instructed below.
Prepare Payroll Summary Report
This summary report has been created so that you can get all the details regarding the total payroll wages, taxes, deductions, and contributions.
In QuickBooks Online Payroll Edition
Firstly, move to the Reports section and opt for the Standard option.
Now, reach for the payroll section and choose the highlighted payroll summary. Apart from this, you must include the report’s name in the search column.
After this, mention the Date Range from the options available and hit the Apply option.
However, if you wish to add or hide a specific detail in this report, pick Customize and then hit the Run Report option.
In the QuickBooks Desktop
Users must move to the Reports column and opt for the Employees and Payroll option.
Soon after this, go with the Payroll Summary option and properly change the date range.
After this, choose the Total Only option from the Show Columns drop-down menu.
2. Also, the users must run the payroll liabilities balances report to verify whether the pending amounts you have paid are correct.
QuickBooks Online Payroll
First of all, proceed to the Reports option and then opt for the Standard option.
You have to scroll down to the bottom of the Payroll section. Otherwise, you can find the Report by Name using the search column.
After this, locate and pick the reports you wish to view.
Thereon, you must apply the filter to your report according to the Date range and hit the Apply button.
QuickBooks Desktop Payroll
Start the process by moving to the Reports option and Employees & Payroll options.
After that, you must pick the report you wish to view and proceed further.
The users may also have the option to Customize the Report if applicable.
Learn How To Reconcile Payroll Liabilities in QuickBooks Payroll.
Go through the following procedure to reconcile payroll liabilities in QuickBooks Payroll.
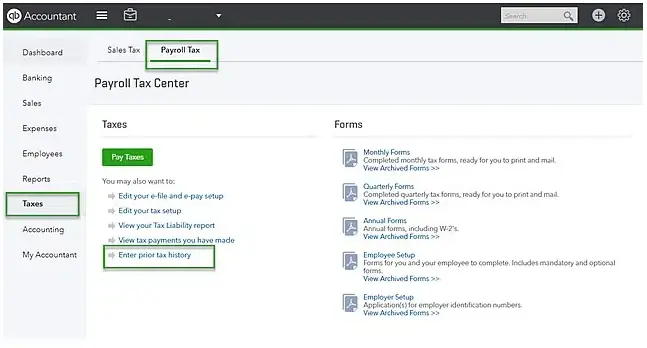
To begin the process, choose the Taxes option from the QuickBooks Online navigation bar.
After this, go with the Payroll Taxes option, and below the Pay Taxes column, pick Enter Prior Tax History.
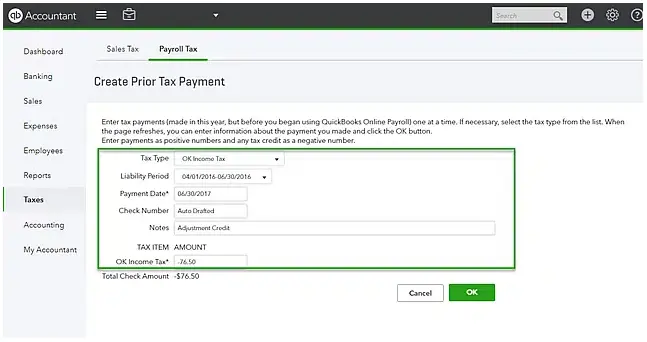
Thereon, the users must browse to the Current year and liability period.
In the next step, navigate to the Current year and liability period.
Following this, tap the Add Payment and then Tax Type option to reconcile payroll tax returns.
Now, you must include the Liability Period and Period Date, the Check Number, and Notes.
Subsequently, you have to construct a credit by establishing a Negative amount.
How to Delete or Remove a Scheduled Payroll Liability in QuickBooks Desktop Payroll?
The users must know they won’t be able to remove the tax liabilities once they have been set up in QuickBooks Desktop. But you can remove other liabilities like 401 (k) contributions, health insurance, and dental insurance. Furthermore, read the procedure elaborated below to remove the scheduled payroll liability in QuickBooks Desktop Payroll.
In the earlier phase, go to the Employees menu and opt for Payroll Center.
Afterwards, hit the Pay Liabilities tab and then the Change Payment Method.
Thereon, choose the Benefit and Other Payments from the QuickBooks Payroll Setup window.
Now, you must hit the Schedule Payments and double-tap on the payroll item to edit.
Beneath the column of Payment Frequency, pick the “I don’t need a regular payment schedule for this item” option.
Finally, tap on the finish button and click the Finish button again.
How do you Delete Payroll Liability Adjustment in QuickBooks using simple steps?
To delete the payroll liability adjustment in QuickBooks Desktop, you must follow the steps below.
Firstly, navigate to the Employees menu and then opt for the Payroll Center.
Thereon, choose the Liability Adjustments from the Transactions tab.
In the next step, tap to view the adjustment and then hit the Delete option.
Once you are done with the process, verify that the SUI has not been selected from the payroll info. Thereon, to wind up the process, go through the procedure below.
In the initial stage, you must apply the first two steps listed above.
Thereon, choose the anime of the employee by clicking on the Employee tab.
Afterwards, select the Payroll Info tab and then the Taxes option.
Below the State section, verify that you have unmarked the SUI option.
Once the process ends, hit the OK button to save the changes.
Learn More About How to enter Payroll Liabilities in QuickBooks
To gather more details on entering payroll liabilities in QuickBooks, follow the steps below.
In the initial stage, you must move to the Employees tab.
After this, go with the Payroll Taxes and Liabilities tab and then hit the Pay Scheduled Liabilities option.
Once you have set the payment frequency, QuickBooks will eventually begin tracing your tax liability.
Thereon, you will also get the Liability window to present you the date you send the payment.
What should you do when QuickBooks Payroll Liabilities are not showing?
Many users often experience QuickBooks Payroll Liabilities not showing issues due to damage or corrupt company files. Therefore, you must apply the resolution methods illustrated below to overcome the issue.
Fixation Way 1: Get the Latest Payroll Tax Table Updates
In the initial phase, open the QuickBooks File menu and choose the “Update QuickBooks” option.
As a result, it will take you to the Update QuickBooks Desktop window.
Thereon, go with the Update Now tab and verify that you have selected the “Tax Table” checkbox from the list of services.
Following this, navigate to the Get Updates option and then move further.
After this, when you are asked to install the most recent version of the QuickBooks tax table update, hit the Yes button for the confirmation.
Fixation Way 2: Ensure that the Payroll Liabilities Are is Updated in the Payroll reports
Here, we have discussed the steps to check whether the payroll liabilities are updated properly.
Begin the process by moving to the Reports menu and opting for the Employees and Payroll.
Thereon, choose the highlighted “Payroll Summary” option from the available options.
Now, you must adjust the date range you wish to review the reports.
Afterwards, move to the “Show Columns” drop-down with the “Total Only” option.
Moreover, you also have to run the payroll liability balance reports to verify whether the amounts are paid.
Wrapping It Up!!
Through this post’s help, we hope you have gained enough information regarding the payroll liabilities in QuickBooks. However, if you find any issues while paying the liabilities, you can consult with our professionals at+1-888-209-3999to get immediate help. They will guide you in the best possible manner as soon as possible.
While preparing the financial reports, the users might make certain mistakes because of using small font sizes. Likewise, using the small font size in QuickBooks might create problems while generating reports. So, the font size in QuickBooks must be larger to understand the data easily. Otherwise, it might result in QuickBooks font size too small issue, which might create blunders in the reports.
However, if you are also dealing with the same issue and want to change font size in QuickBooks, continue reading this post. Thus, it would help you properly prepare your reports without any further discrepancies.
Do you want to find the exact solution to change QuickBooks font size issue? Ring us at Call Us : +1-888-209-3999 and talk to our highly-certified professionals to rectify the issue instantly.
Reasons Why Users Might Experience QuickBooks Desktop Font Size Too Small Issue
In this blog’s section, we have described the root causes that might be responsible for the QuickBooks Desktop font size too small issue.
Sometimes, it may happen when you have installed the new higher-resolution monitor.
You may have recently made some changes in the DPI settings.
Another reason could be improper settings of the Windows display.
In other instances, this issue may arise while using the unsupported version of the QuickBooks Desktop.
How To Change Font Size in QuickBooks Desktop Using These Simple Steps
If you are also dealing with the font size issue in QuickBooks, you no longer have to worry. So, you must perform the steps given below to change font size in QuickBooks Desktop.
Stage 1: Steps to Set the Font Size to Normal In QuickBooks
Use the procedure below to set the font size to normal in QuickBooks.
In the first place, shut down the QuickBooks application and then proceed further.
After this, browse to the My Computer section and then browse to C: drive.
In the next step, double-tap on the Program Data folder and include the QuickBooks 20XX (according to QB version you are using) beneath the Intuit folder.
Thereon, you must choose the QBW.INI file and then launch it on your device.
Now, beneath the [FONTS] section, hit the Enter key and include the following commands:
FontName=Arial (or any font of your choice)
FontSize=12.5 (or any size of your choice)
End the procedure by shutting down the file and then opening the QuickBooks application to view the changes in the font size.
Stage 2: Procedure to View the Font Size Bigger in QuickBooks
There are many instances when the users find the QuickBooks icon to appear too small on the computer screen. Therefore, you need to make certain changes in the DPI to increase font size in QuickBooks Desktop. For that, you must apply the instructions outlined below.
To begin the process, press the Windows key on your keyboard and navigate to the Control Panel.
After this, select the Display option, and it will show you three different display options: 100% (default), 125%, and 150%.
Apart from this, the users can also view these settings within the QuickBooks application. For that, use the steps illustrated below.
Firstly, launch the QuickBooks application and browse to the Edit section.
Following this, choose Preferences, followed by the Desktop View option from the left.
Thereon, navigate to the My Preferences option and then opt for Display to check the settings.
If you are still struggling with the issues related to font size QuickBooks desktop, you can use the following troubleshooting methods to adjust the display settings.
Way 1: Modify The QuickBooks DPI Settings
Initially, look for the QuickBooks icon and right-click on it to pick the Properties option.
Thereon, browse to the Compatibility tab and verify that you have chosen the Disable display scaling on high DPI settings.
After this, hit the Apply button followed by OK to proceed further.
You are supposed to launch the QuickBooks application once again and test whether the Windows is visible or not.
Way 2: Make Certain Changes to the Desktop View Preferences
To modify the Desktop View preferences, you need to follow the steps instructed below.
Begin the process by launching the QuickBooks company file on your device.
Afterwards, go to the Edit menu and opt for Preferences to make the necessary changes.
Following this, choose the Desktop View option and then My Preferences.
You are supposed to shift View from Multiple Windows to One window.
Way 3: Alter Your Screen Size
Initially, you are supposed to click and drag the QuickBooks window until you notice that the upper corner of the window meets the upper-left corner.
Thereon, you must drag the QuickBooks to the lower-right corner of the QB window to adjust the screen size.
Afterwards, double-tap on the QuickBooks title bar to increase the window. You may also tap on the square icon on the left of the X button.
Way 4: Changing the Screen Resolution
Primarily, hit the Windows + M keys together to minimize all the Windows open and view the desktop.
After this, you must right-click on the empty space of your desktop and opt for Screen Resolution.
In the next step, tap the Resolution drop-down menu and proceed further.
Following this, click and drag the Resolution slider to pick the new resolution. If you pick the value closer to “high,” it will increase the screen resolution. Conversely, switching to a value closer to “Low” will minimize the screen resolution.
Once done, tap anywhere outside the slider box to shut down the Resolution settings.
At last, hit the OK button and then go for the Keep Changes option to establish a new resolution.
Stage 3: Go through the Instructions when the QuickBooks font size is too small to read on the printed sales forms.
Primarily, launch the QuickBooks application and tap the Gear icon from the left corner.
After this, navigate to the Custom Form Styles and pick a form style.
Thereon, choose the Edit option and then pick the Design option.
You are supposed to tap the Select a different font and then pick between the three different font size option.
In the next step, hit the Preview or Print option to pick the font size.
How do you change font size in QuickBooks Online using simple steps?
If you are also struggling with the small font size in QuickBooks, then you can apply the steps below to change font size in QuickBooks Online.
For the Google Chrome Users
Start the process, by tapping the menu icon represented by three dotted lines.
Afterwards, choose the Settings option and then navigate to the Appearance section.
Thereon, opt for the Font Size drop-down menu and tap the Small option.
Now, the users must hit the Page Zoon drop-down menu and select one number that is lower than 100%.
After completing the process, you must refresh the page and open the QuickBooks Online account.
For the Firefox Users
Initially, tap the Hamburger icon and opt for the Settings option.
After this, the users must click the drop-down arrow next to the Size option and then update it.
You need to refresh the page and then verify the size of your QuickBooks Online account.
To Summarize The Above!!
With the help of this post, you can now easily overcome the QuickBooks Font Size too small issue. If you still face difficulty with the font size, contact our professionals at Call Us : +1-888-209-3999 for a quick resolution. They will assist you with the most effective ways to solve the problem.
“Cannot open my QuickBooks company file!” Are you also searching for such queries? If yes, you will find relevant solutions to this issue in this well-detailed blog post. The QuickBooks not opening company file error is one of the common ones among daily QuickBooks users. Users may encounter this company file issue due to the damaged file extension.
To manage this issue, you need first to understand the error, learn its reasons, and continue applying methods to resolve it. Let’s begin!
QuickBooks Not Opening Company File: What’s This Issue?
Among the numerous QuickBooks company file errors, the QuickBooks not opening company file also commonly erupts with a supporting message. This message on the user’s screen read as “Can’t open QuickBooks: QuickBooks already has a company file open. If you want to open another company file, close this one first.” Also, the problem states, “Only QuickBooks Accountant and QuickBooks Enterprise Solutions can open two company files at once.”
As a result of this error, users fail to collect the data from their earlier QuickBooks company files. Eventually, such company file issues hamper users’ daily productivity.
Why is My QuickBooks Not Opening a Company File? Common Reasons
It may be hard to find out what has rooted the QuickBooks not opening company file error. Therefore, we have listed some of the common reasons to help you better.
Insufficient permission access to the QuickBooks company file folder can trouble you while opening the company file in QuickBooks.
What else can stop QuickBooks from opening the company file is the corrupted or damaged files in your QuickBooks database.
The corruption or damage of the company file when it was being used earlier, can also interrupt users from opening the company file.
Another reason users cannot open QuickBooks company file is the issues with the location and extension of the QuickBooks company file.
Issues with your file reports can also result in the not opening QuickBooks company file error.
The outdated version of your QuickBooks Desktop application can also lead to company file opening issues.
The system’s hard drive issue is also among the common reasons for users cannot open QuickBooks company file.
How Can I Fix the QuickBooks Company File Will Not Open Issue?
You can easily troubleshoot if the QuickBooks company file will not open problems by undertaking the solutions mentioned below in the section.
Solution Method 1 – Change the .TLG and .ND File Names
Sure! The QuickBooks company file won’t open error can be rectified by renaming the.TLG and.NDfiles. For this, execute the steps given below:
Initiate this method by first navigating to your Windows Startmenu. In theSearchbar, type File Explorer.
Once you get theFile Explorer window, search for where you have saved your QuickBooks company files.
Now, do not search for the primary company files but browse the .TLGand .NDfiles. Remember, these files would be named [Your company file name].qbw.nd and [Your company file name].qbw.tlg.
Once you find these files, now separately right-click these files and choose theRename options respectively.
Rename these files by adding the .oldextension in the last file name. After performing these steps, you must open your QuickBooks application and the company file.
If you still face the QuickBooks company file won’t open error, continue applying the next troubleshooting method.
Solution Method 2 – Try to Open your Company File Directly from QuickBooks
To eliminate the QuickBooks not opening company file issue, you must follow the given procedure to open the company file directly from your QuickBooks application.
First, select the QuickBooks company file from the No Company Openwindow.
In this step, press and hold theALTbutton on your keyboard, and continue to hit theOpen option.
If you find issues opening this QuickBooks company file, first select and click theEdit menu.
From this drop-down Edit menu, choose the preference alternative and continue to hit the Desktop view option.
Select the Don’t save the Desktopoption and end this procedure by finally hitting theOKoption.
Solution Method 3 – Verify the Extensions of your QuickBooks Company File
To know why your QuickBooks is unable to open this company file, you need to verify the properties and extensions of that very QuickBooks company file. Let’s see how:
Start this solution by first opening the folder containing yourQuickBooks company file.
After this, once you have found the company file, right-click it, and click the Properties option.
In this step, make sure that your QuickBooks company file has the .qbwextension and that the size of the file is at least 7 MB.
Once you have ensured these mandatories, choose the Advancealternative and remove the tick-marks from the selectedcompress andencrypt attributedboxes.
Finally, conclude this procedure by hitting the OKbutton. If still, QuickBooks is unable to open this company file, move to the next method.
Solution Method 4 – Move your QuickBooks Company File to a New Location
Let this troubleshooting method help you solve the QuickBooks company file won’t open error. Follow the jotted-down steps to move your QuickBooks company file to a new location:
First, create a new folder in your computer’sC: Drive, and open the file folder containing the QuickBooks company files.
Press theCTRL button on your keyboard and right-click thecompany fileplus the TLG fileto choose theCopy option to copy these files.
In the end,paste the copied files into the newly created folder in C: Drive.
In a Nutshell..!
That’s all! We hope this well-elaborated blog has explained to you why your QuickBooks is not opening a company file and how to figure out this issue. However, if you fail to rectify this company file issue on your own, consider contacting our expert QuickBooks Desktop Support team. Reach out to our QuickBooks professional crew via Live Chat Support!