Want to gather all the details regarding the factors responsible for QuickBooks Error 6069 and how to figure it out? If such questions are striking into your mind, this is the blog that you are searching for. Most often, the users might encounter this error while opening the company file. It mainly arises due to improper Windows configuration or damage to the company file.
Upon the arrival of the QuickBooks Error Code 6069, the users won’t be able to access their data file, which might prevent them from continuing their ongoing tasks. As a result, it might waste your precious time that the users could otherwise invest in the company’s growth. So, resolving the error instantly with the resolution methods explained further in the post is essential.
Are you unable to access the company file due to QuickBooks Error 6069 and need instant help? Contact us at Call Us : +1-888-209-3999 and consult with our professionals for immediate help.
What Do You Mean By QuickBooks Error 6069?
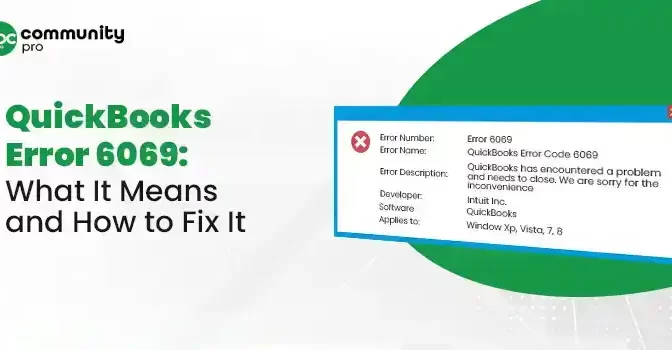
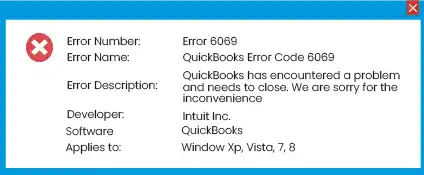
The users often encounter QuickBooks Error 6069 while attempting to launch the data file. The main cause behind the error is damage to the data file, which stops users from accessing it. Every time the error occurs, the following error message comes into view stating:
“QuickBooks has encountered a problem and needs to close. We are sorry for the inconvenience.”
On the QB Desktop Error 6069 occurrence, you might observe that QuickBooks begins to crash or freeze. As a result, it might lead to losing crucial information if it still needs to be saved. However, figuring out how to regain access to the data file is important to accomplish your task.
Read More- Learn How to Resolve QuickBooks Desktop Keeps Crashing?
Possible Factors That Might Lead to QuickBooks Company File Error 6069
The users might encounter QuickBooks Company File Error 6069 due to damage or corruption in the company file. Besides this, numerous other factors might give rise to the error we mentioned below.
- You might be working on the QuickBooks Desktop application of the unsupported version.
- In other cases, users might end up with the error due to the damage in the Windows Registry.
- There may be damage in the installation of the QuickBooks application.
- Sometimes, it may evoke if the third-party application interrupts users from operating QuickBooks.
- It may appear when you don’t have sufficient disc space to run the QuickBooks company file.
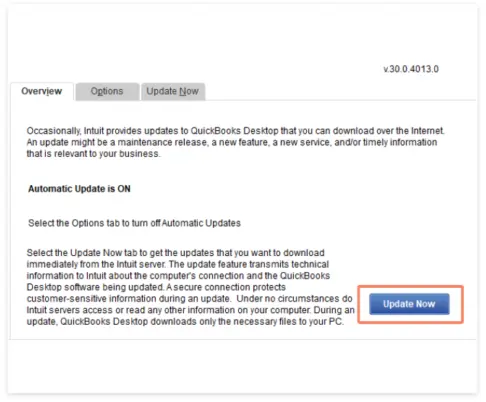
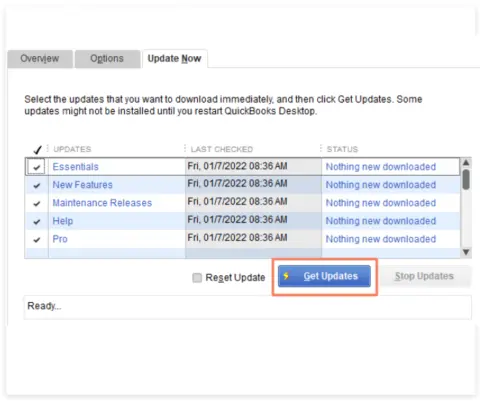
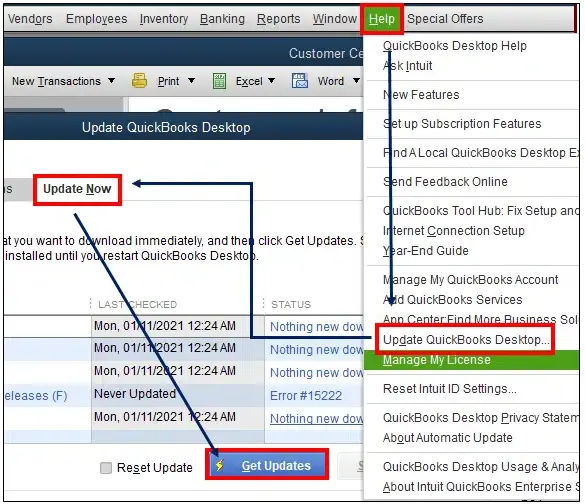
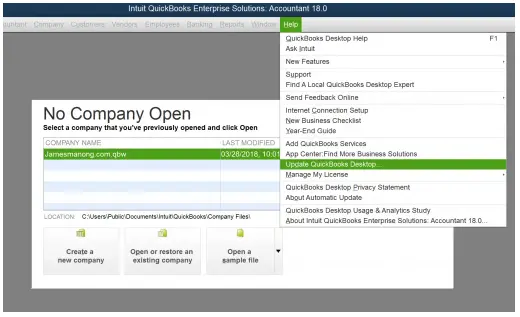
Read Here- Learn How to Update QuickBooks Desktop to the latest version
How can I Recognize the Occurrence of Error 6069 in QuickBooks?
There are numerous company file errors in QuickBooks, such as QuickBooks Error 6120, 6147, 6176, and 6069. However, to determine that you are encountering Error 6069 in QuickBooks, look at the signs and symptoms listed below.
- The users might experience an active program crashing upon the occurrence of the error message.
- It may appear when your system begins to hang frequently.
- Due to QuickBooks Error 6069, the users won’t be able to access the company file.
- Sometimes, it may happen due to the inaccurate configuration of QuickBooks.
- Your device may take longer to load the data file than usual due to a lack of storage space.
Learn More-What To Do When QuickBooks Direct Deposit Not Working?
Resolution Methods To Rectify QuickBooks Desktop Error 6069
Here, we have elaborated all the possible troubleshooting methods that you can utilize to resolve QuickBooks Desktop Error 6069 easily.
Measure 1: Check the Extension Of Your QuickBooks Company File
Sometimes, the wrong file extension of your QuickBooks data file might give rise to Error 6069 in QB Desktop. Therefore, you must check the file extension using the steps below to resolve the issue.
- Begin the process by launching the Windows File Manager on your device.
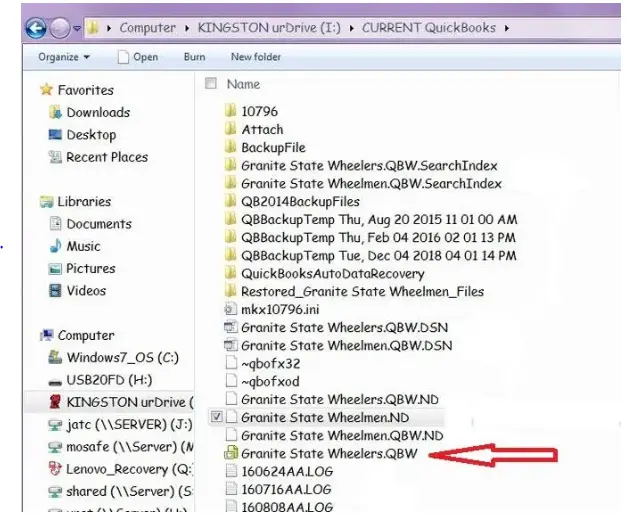
- After this, browse to the QuickBooks Installation Directory and then move to the location where your company file folder is located. You will mainly spot the data file in the location i.e “C: >> Users >> Public >> Documents >> Intuit >> QuickBooks >> Company File folder.”
- Now, you are supposed to verify that the QuickBooks Company File has .QBW file extension.
- However, if you spot that the file has a different extension, right-click on it and pick the highlighted Rename option.
- You should replace the existing extension with .qbw and save the file name.
- At last, try to launch the QuickBooks data file again and check whether the issue is resolved.
Related Article- How To Delete a Company Data in QuickBooks Desktop & Online?
Measure 2: Add QuickBooks As a Trusted Program in AVG
There might be a certain possibility that the antivirus program doesn’t consider QuickBooks as a trusted website. So, to prevent QuickBooks Error 6069, you need to add QuickBooks as a trusted website by following the instructions below.
- In the first place, launch the AVG antivirus on your device.
- Afterwards, choose the Computer icon and opt for the Settings menu.
- In the next tab, beneath the Exception section, you must hover your cursor over the Add Exceptions tab.
- Thereafter, move to the Exception drop-down menu and hit the File menu.
- Now, tap the Browse button and look for the QuickBooks Utility file from the QB installation section.
- At last, hit the OK button twice and click Yes to save the settings properly.
Measure 3: Make Use of the Intuit Sync Manager
You must follow the steps below to use the Intuit Sync Manager to rectify the QuickBooks Error 6069.
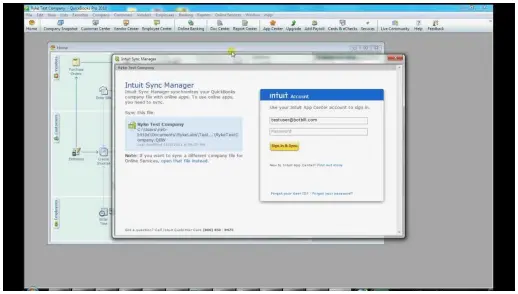
- Begin the process by signing into the system as an Administrator.
- After this, launch the Intuit Sync Manager and tap the Options tab.
- Thereon, you must navigate to the Show Details tab and proceed further.
- In the next step, choose the company name and right-click on it to pick the Company Info option.
- Now, verify that the path mentioned in the location is correct.
- You must launch the company folder again and replace the present data file with the original one.
Related Blogs- QuickBooks Tool Hub – One-Stop Solution For All the QB Errors
Measure 4: Enable the QuickBooks through AVG Firewall
- First of all, launch the AVG antivirus software and tap on the Firewall option.
- Afterwards, below the Settings section, you must choose the Applications option.
- Thereon, you must look for QuickBooks from the list of programs AVG firewall.
- However, if you determine that the application status is fixed as Block, you must switch to the Allow option.
- On the other end, if you won’t see QuickBooks in the list of programs, hit Add and then search for the QuickBooks file from the installation directory.
- In the next step, tap the Create button and then the OK button twice.
- You must save the desired changes by tapping the Yes button.
- Ultimately, try to run the QuickBooks application again and verify whether the issue is resolved.
To Wrap Things Up!!
Here we come to the end of this post, and we hope the resolution methods explained above will have helped you tackle QuickBooks Error 6069. However, if you are still encountering issues while accessing the data file, you must have a conversation with our experts at Call Us : +1-888-209-3999 for quick resolution. They will offer you some useful tips to figure out the issue instantly.

![Fix QuickBooks Unrecoverable Error | [Complete Guide]](https://www.qbcommunitypro.com/wp-content/uploads/2023/08/Fix-QuickBooks-Unrecoverable-Error-1-672x350.webp)