QuickBooks Desktop, a leading accounting software, offers a robust feature called “Charts of Accounts” that can help you organize and categorize your financial transactions in a systematic and efficient manner.
In this comprehensive guide, we will search into the world of Charts of Accounts in QuickBooks Desktop and explore how you can leverage this powerful tool to streamline your bookkeeping processes and gain valuable insights into your business’s financial performance.
What are Charts of Accounts in QuickBooks Desktop?
The Charts of Accounts (COA) in QuickBooks Desktop is the list of documents that QuickBooks uses to track your company’s financial growth. You may use these documents to categorize the transactions. These documents can be categorized from sales forms to tax forms to reports, depending upon the type. In short, charts of accounts provide the list of balances and the accounts that an organization holds.
QuickBooks Services
Accept credit card payments where you do business – in the back office, in your retail store, on your website, or on your mobile device.

It gives you an understanding of how much an organization owns and how much it owes. With the help of charts of accounts, you can track the growth rate of an organization. Charts of Accounts are crucial aspects of an organization, so it is very important to have complete knowledge of them.
5 Main Account Types in The Chart of Accounts QuickBooks
The Charts of Accounts are the backbone of QuickBooks. For a smooth procedure and to get the right financial report, choosing the right type of charts of Accounts for your organization is very important. The right type of accounts will determine which type of report is required for the organization.
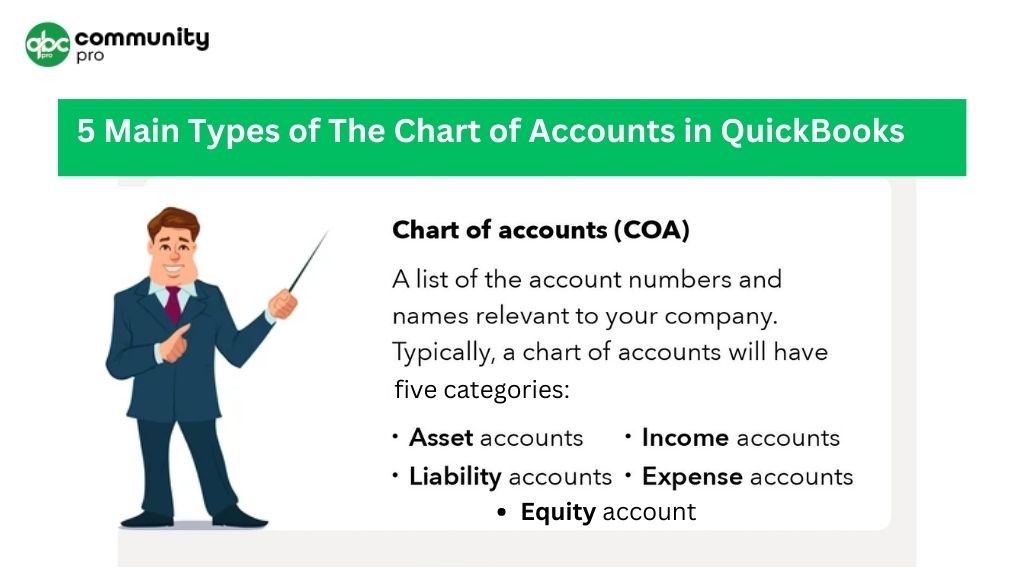
There is a long list of documents in the charts of Accounts, known as accounts history. The main charts of Account types can be breakthrough into five different types. The main accounts are further sub-categorized into different types. The breakthrough of the types of charts of accounts are:
- Assets Account
- Income Account / Revenue Account
- Equity Account
- Liability Account
- Expenses Account
Assets Accounts
The balance sheet normally states the financial growth of the company. They normally depict the value that the company owns. The assets account falls in the category of balance sheet. The assets accounts include the liquid assets of the company. This type of account helps in keeping track of how much the organization pays for a particular thing.
The assets can be further categorized into:
- Accounts receivable
- Cash
- Undeposited Funds
- Marketable securities
- Prepaid Insurance and Expenses
- Cash Balance
- Buildings
- Types of equipment
- Computers
Liability Account
The liability account holds the value of what the company owes. Since the company is obliged to pay for the items that fall under this category, most of these accounts are payable. The liabilities accounts are further sub-categorized into the following:
- Wages payable
- Notes Payable
- Accounts Payable
- Company Credit Cards
- Accrued Liabilities
- Taxes Payable
- Bank loans
- Personal Loans
Equity Account
The equity amount holds the value of what is left with the company after paying the liabilities. The equity account can be further sub-categorized into the following:
- Retained Earnings
- Common Stock
- Preferred Stock
Revenue/ Income Accounts
The revenue stock usually falls under the income statement accounts. The revenue account usually holds the value that your organization earns from its clients after providing the services. The income account can be further sub-categorized into:
- Dividend income
- Rental Income
- Sales Income
- Contra Income
Expenses Account
The expense account holds the value of what your company spent. In simple terms, it means that this type of account holds the money that you no longer have with you. It is always advisable to break down your expenses into subcategories. The expense account can be further categorized into the following:
- Advertising Expenses
- wages
- Cost of Sales
- Interest Expenses
- Depreciation Expenses
- Bank Fees
- Travel Expenses
- Utility Expenses
- Rent expenses
- Other expenses
Purpose of the chart of accounts in QuickBooks Desktop
The charts of accounts play a crucial part in any organization. There are numerous reasons to have charts of accounts on QuickBooks desktop. Some of the main purposes of charts of accounts are listed below:
- It helps in keeping track of the financial growth of an organization.
- Carts of accounts help the new individual to understand your business and its finances in a quick and easy manner.
- The charts of accounts help in tracking the expenses and income so that you can quickly calculate the financial ratios of the organization.
- It is easy to track the flow of money within the organization.
- Keeps track of transactions in a simple manner.
Using charts of Accounts is simple and helps you to make better decisions for your business. With the well-designed charts of accounts in QuickBooks, it is easy to follow the standards in accounting.
How to Setup a Chart of Accounts in QuickBooks?

If you have already installed QuickBooks on your desktop and looking for How do I use a chart of accounts, then here we try to explain the process in a simple manner. Setting up a chart of accounts is relatively simple. But, at the same time, it may be a time-consuming process. All you need is to open the blank sheet and set up the columns.
Follow the following steps to set up a chart of accounts in QuickBooks:
- Assign Business Accounts Name
- Create the Business Account
- Allot Account Numbers to Business Accounts
Step 1: Assign Business Accounts Name
Use the main account to categorize your business into different main categories. The main categories are universal to any business. The main types of charts of accounts in QuickBooks are – assets, equity, liability, expense, and revenue/income.
Step 2: Create Business Accounts
Now you have already created the accounts for your business. Next, you have to categorize it further according to the type and nature of your business. The subcategories must be fallen into the relevant parent category. For example, sales revenue and interest will be categorized into revenue accounts. The common accounts for the service-based company include:
- Supplies
- Cost of Sales
- Wages
- Office Rent
- Accounts Payable
- Cash
- Types of equipment
- Income Tax Payable
Step 3: Assign Account Numbers
The next step is to assign the account numbers in order to organize all your accounts. The four-digit numbering system is used to assign the numbers in the chart of accounts on the QuickBooks desktop. The most common type of template used in assigning and creating the accounts are:
- Expense accounts: It ranges from 5000 to 5900 number
- Liability accounts: It falls from Numbered 2000 to 2900
- Revenue accounts: It falls in between 4000 – 4900 number
- Asset accounts: It ranges from 1000 to 1900 number
- Equity accounts: It can be assigned number in between 3000-3900
Tips for Organizing Your Chart of Accounts
You have already created the chart of accounts in QuickBooks. Organizing the charts is an important task. You can add or delete the columns in the charts of accounts as per your requirement. Below are some of the tips that will help you in organizing the COA:
Keep it Simple
When you are setting up the account for the first time, it is advisable to keep the name of the list simple. It is advisable to use names that make sense to you and to your accountant.
Sub Categorize
Instead of creating a new line item for each new transaction, you can subcategorize it. This will make your task easier.
Keep the Track
The COA is crucial to track the financial growth of the organization. With the passage of time, the sheets are added. It is advisable to keep track of every sheet added or deleted. The general rule to add or delete the column is to add the sheet as it came in but wait for the year’s end to delete the sheet.
Do not Delete Old Columns
Deleting the old columns from the account sheet may be the problematic one. Instead of deleting the old columns, it is advisable to hide the columns for future reference.
Add Columns wisely
You must add the new columns wisely in the sheet/ Before adding the new columns, look out if the column already exists. Adding too many unnecessary columns in the sheet makes it lengthy and confusing.
How To Add an Account in QuickBooks?
To add the new account in QuickBooks, follow the below-mentioned simple steps. The steps include the following:
- Visit Bookkeeping and the open Charts of Accounts
- Now select New
- Pick the appropriate account type from the drop-down menu
- Next, select the detail type available in the drop-down menu
- Fill out all other details and save the document
How to Modify the Chart of Accounts in QuickBooks Desktop?
In order to edit the account, you need to follow some of the steps which are mentioned below. The steps include the following:
- Open the Charts of Accounts in the bookkeeping.
- Pin point the account you want to edit.
- Next, select the account history.
- Opt for the transaction you want to edit.
Make changes in the available field. Depending upon the need, you can edit, delete, add, or cancel.
How to Export/ Import Chart of Accounts?
You can import or export the charts of accounts. The easiest way to export the file from one organization to another is to use the IIF file type. You can follow the simple steps to export the file from one location to another. The steps are as follows:
- Go to the File
- Next, under the file section, click on the utilities.
- Under the utility section, click on the export
- Export the file as IIF
Why Use Charts of Accounts?
As your business grows, you need software that is fast, accurate, and reliable. QuickBooks is an effective way to track all your financial tasks. The software helps in making a better and quick future financial plans. The charts of accounts help in better understanding the financial goals of the company. Some of the common reasons for choosing the charts of accounts are mentioned below:
- Track all financial statements
- Keep track of what an organization owns and owes
- It keeps track of all expenses
- It helps in tax file return
FAQs
Q: Can I modify the Chart of Accounts in QuickBooks Desktop?
Yes, you can modify the Chart of Accounts in QuickBooks Desktop. You can add, modify, or delete accounts as needed to accurately reflect your business operations and financial reporting requirements.
Q: Can I assign account numbers to my accounts in the Chart of Accounts?
Yes, you can assign unique account numbers to your accounts in the Chart of Accounts in QuickBooks Desktop. This can help in quickly identifying and sorting accounts for ease of use and financial reporting.
Q: Can I use sub-accounts in the Chart of Accounts?
Yes, you can use sub-accounts in the Chart of Accounts in QuickBooks Desktop. Sub-accounts allow you to create a nested structure that reflects the relationships between different accounts, making it easier to organize and group similar accounts together for reporting and analysis.
Q: Do I need to regularly review and update my Chart of Accounts?
Yes, it’s important to regularly review and update your Chart of Accounts in QuickBooks Desktop to ensure accuracy and relevance. As your business evolves, your financial needs may change, and you may need to add, modify, or delete accounts accordingly.
Q: Can I customize the Chart of Accounts in QuickBooks Desktop?
Yes, you can customize the Chart of Accounts in QuickBooks Desktop. You can hide or make accounts inactive, add subtotals to parent accounts, customize account reports, and use account types and tax line mapping for accurate financial reporting and compliance with tax regulations.
Conclusion
the Chart of Accounts in QuickBooks Desktop is a critical component of your business’s financial management. By setting it up and managing it effectively, you can gain accurate insights into your business’s financial health, make informed decisions, and achieve better financial management. Follow the best practices outlined in this article to optimize your Chart of Accounts and ensure smooth financial operations in QuickBooks Desktop.
Remember, your Chart of Accounts is the foundation of your financial reporting and analysis in QuickBooks Desktop, so invest the time and effort to set it up correctly and keep it updated regularly. With a well-organized and properly managed Chart of Accounts, you can have a clear and accurate picture of your business’s financial performance, which is essential for making informed decisions and achieving financial success.